
v1.6.0
When a new version of VCAserver has been released for Windows, you can download and update to use the new features and benefit from the improvements we have made. This is the guide on how to update VCAserver to the latest version.
Note: Please make sure to backup your VCAserver configuration before making any changes. Refer to the section titled Backup Configuration from the user guide for more details.

On the VCA Technology website you will see the latest version of VCAserver
When the download has finished, the file will be ready to be installed.
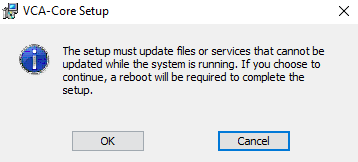
*Note: During the installation process, you will be notified that a reboot is required to complete the setup.
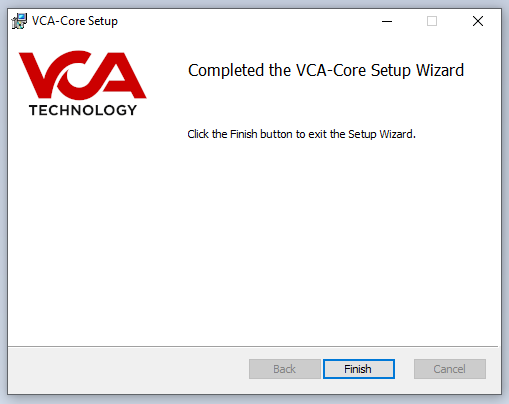
VCAserver is now installed and can be accessed via a supported web browser.
When a new version of VCAserver has been released for Linux, you can download and update to use the new features and benefit from the improvements we have made. This is the guide on how to update VCAserver to the latest version.
Note: Please make sure to backup your VCAserver configuration before making any changes. Refer to the section titled Backup Configuration from the user guide for more details.
On the VCA Technology website you will see the latest version of VCAserver
Note: If you’re going to be using a different machine please check the hardware requirements first before installing.
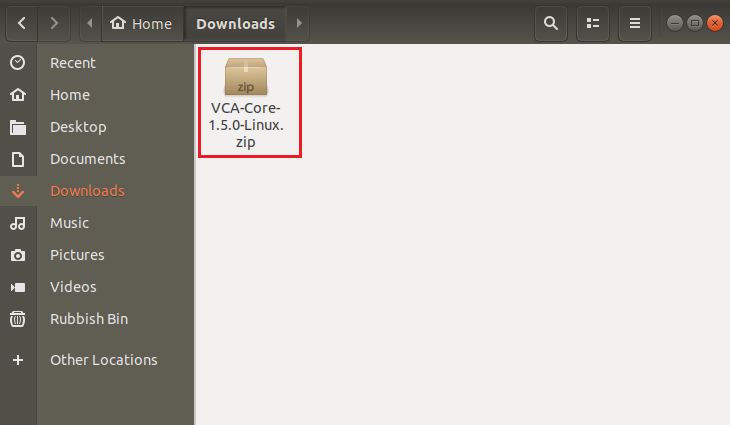
When the download has finished, the file should be placed in your Download folder directory.
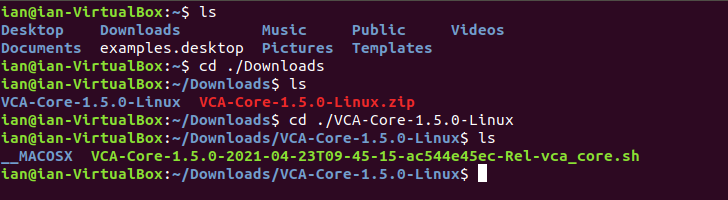
chmod +x ./VCA-Core-**VERSION_NUMBER**-vca_core.sh
Example: chmod +x ./VCA-Core-./VCA-Core-1.5.0-vca_core.sh)
sudo ./VCA-Core-**VERSION_NUMBER**-vca_core.sh
Example: sudo ./VCA-Core-1.5.0-2021-04-23T09-45-15ac544e45ec-Rel-vca_core.sh
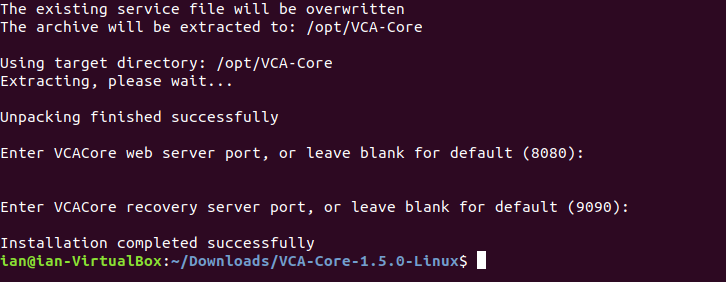
VCAserver is now installed and can be accessed via a supported web browser.
VCAcore supports GPU acceleration for the deep learning features with the following requirements:
Further details can be found in the VCAserver manual or view our web version
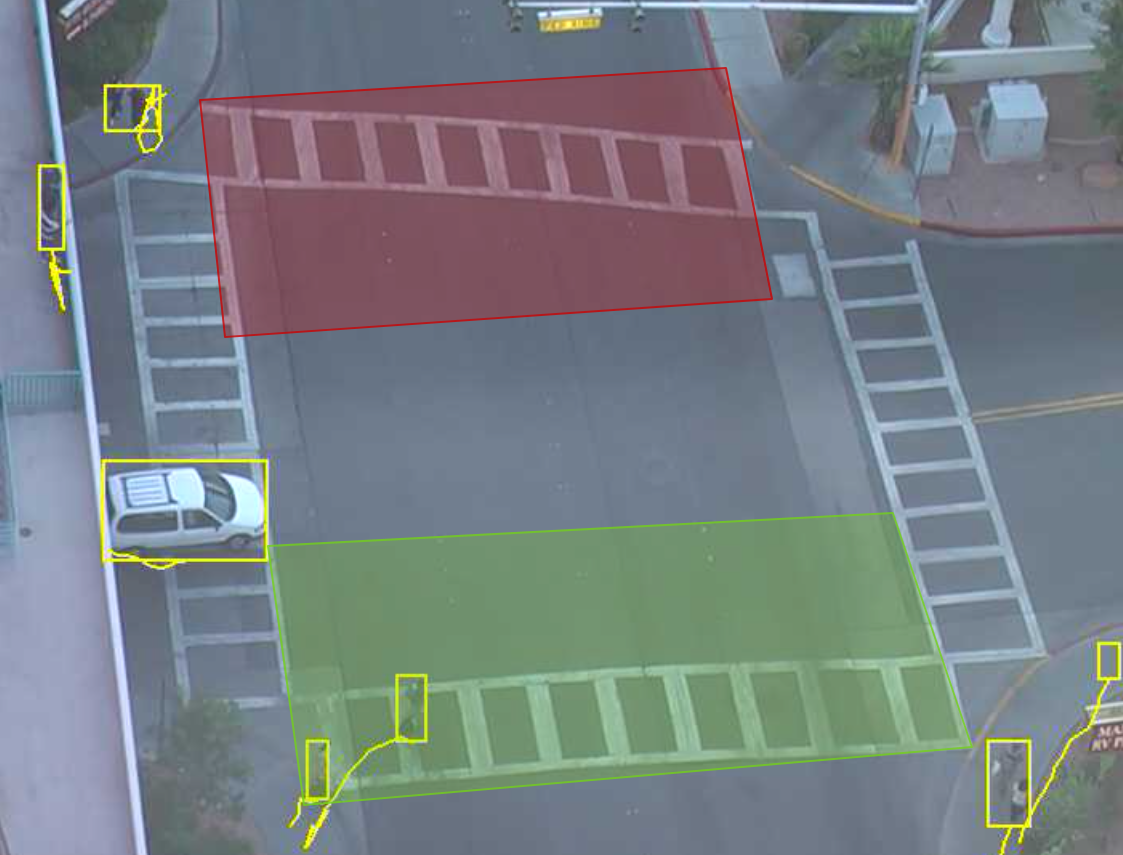
A double knock logical rule triggers when an object enters a zone that had previously entered another defined zone within a set period of time. During the creation of the logical rule, you define the period of time for an object to pass from the first zone to the second zone.
This combination of rules and logical conditions is useful if you want to track objects but only produce alerts when objects pass from one zone to another within a certain period of time.
Objects can be present in the first and second zones without triggering alerts, if an object goes from the first zone into the second zone within 5 seconds, an alert will be created.
Please refer to the Double Knock Rule in the online documentation or you can have a look at the Combined Rule 1.7.1 What is a Double Knock Rule? in the FAQ on Rules section for more information. We also have a YouTube - Double Knock Rule.
Note: for this example, we have named the zones and rules to allow the feature to be understood. You can use any naming convention for channels, zones and rules. we have used the presence rule to trigger the presence of an object in a zone, you can use any of the available rules.
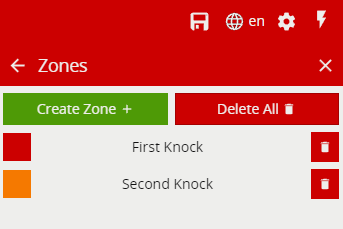
Creating your two Zones for the Double Knock rule.

This is how the two Zones should look like
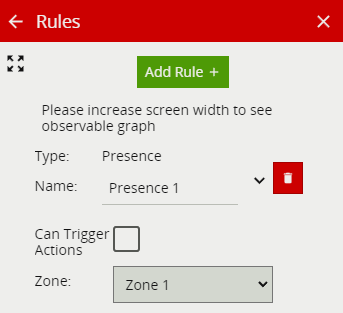
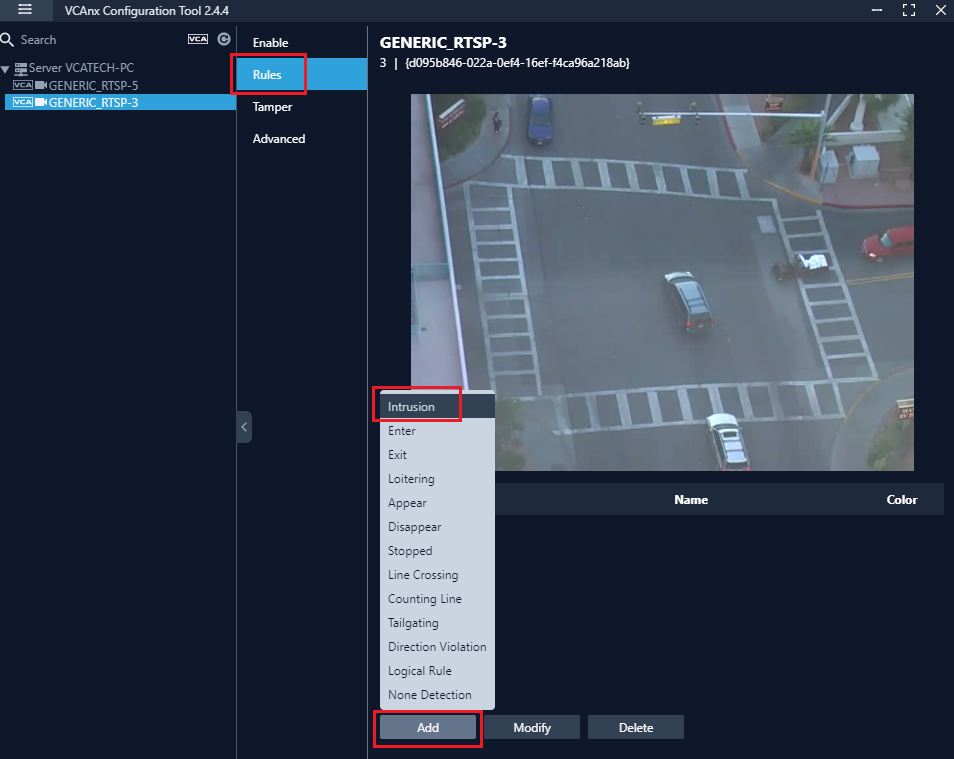
Select Configure rules from one of the zones or navigate out to the channel options and select Rules.
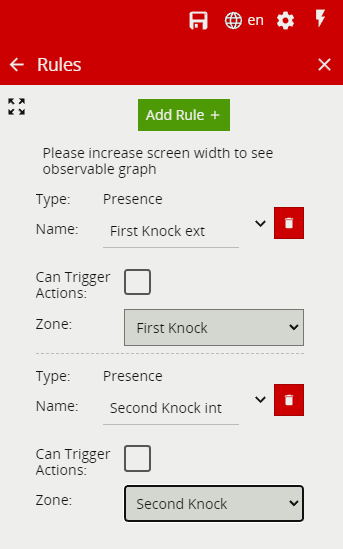
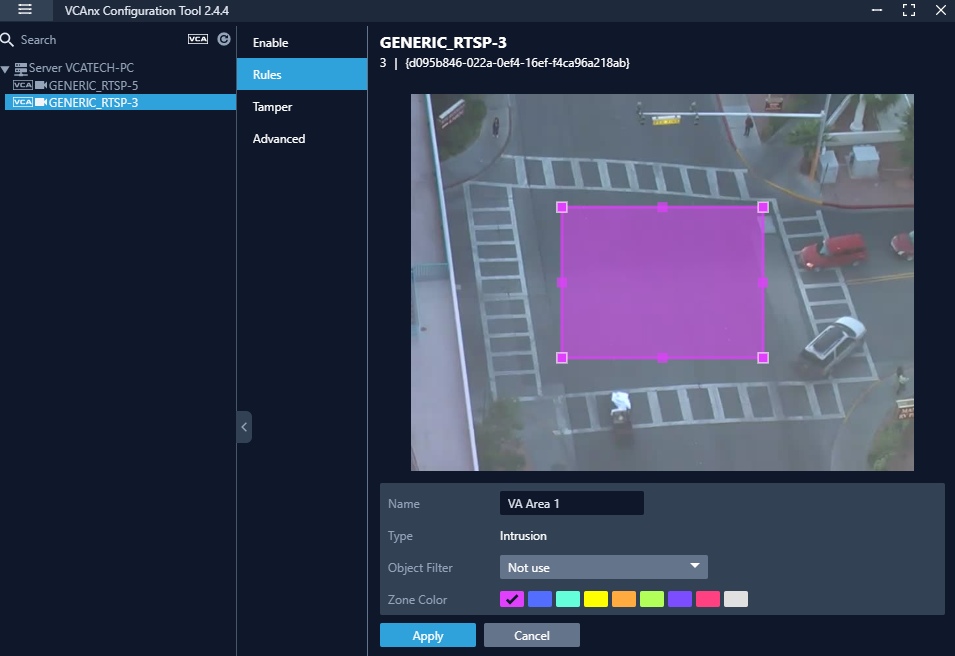
Configure the options as defined below.
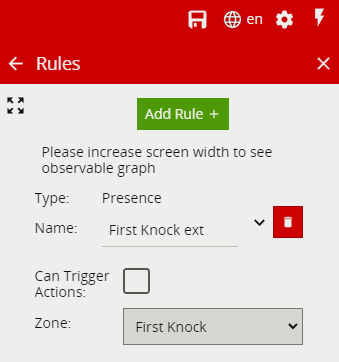
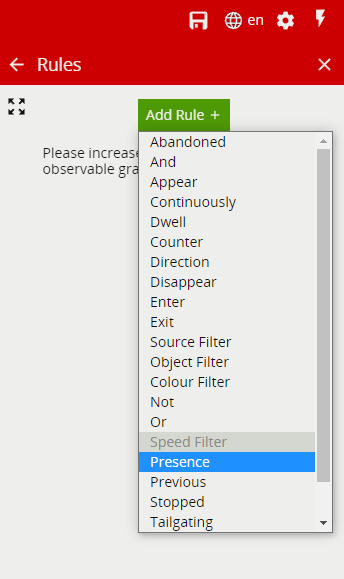
Select Presence Rule
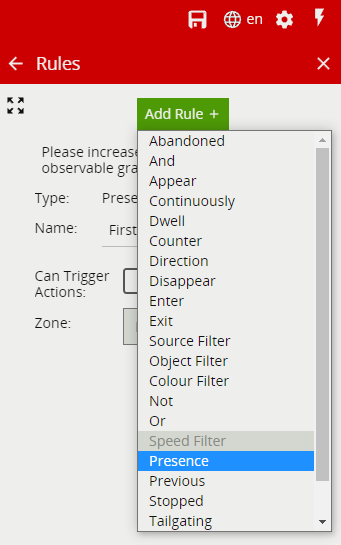
Configure the options as defined below.
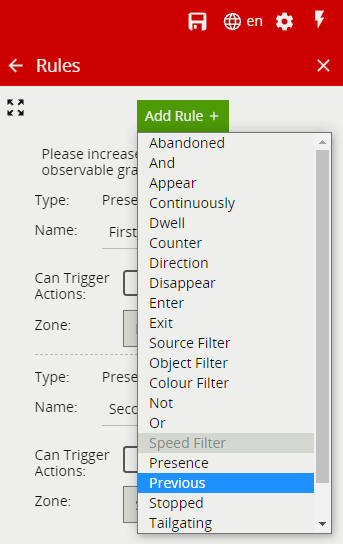
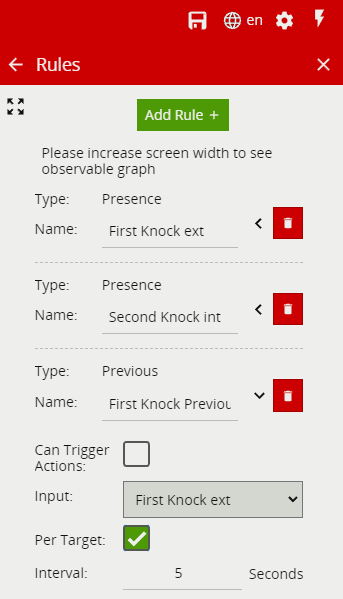
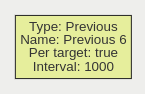
Select Previous Rule
Note: The previous rule will keep the alert active for the defined period of time and allows the double knock rule to work
Configure the options as defined below.
Note: This is the amount of time for an object to go from the first knock zone to the second knock zone.
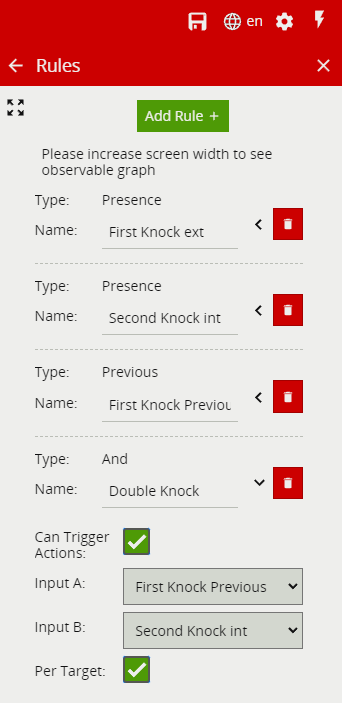
Select And Rule
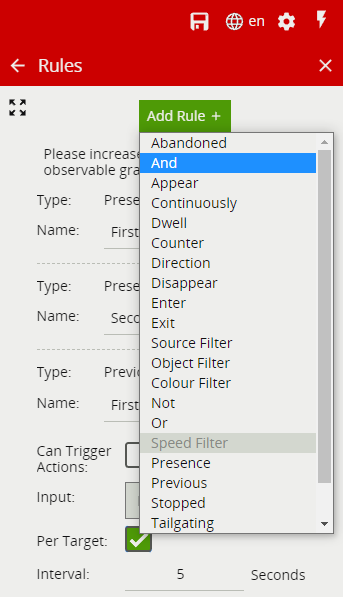
The And Rule is the last link in the chain and is used to compare the states of two different rules, configure the options as shown below.
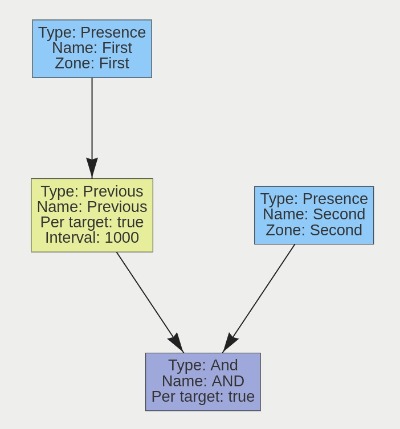
When all the Rules has been created, you can confirm the links by viewing the Observable Graph.
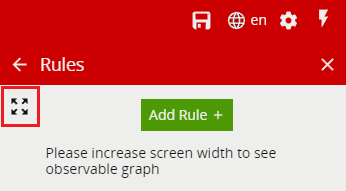
The Observable Graph shows you the whole full layout of the Double Knock Rule, this is how it should look.

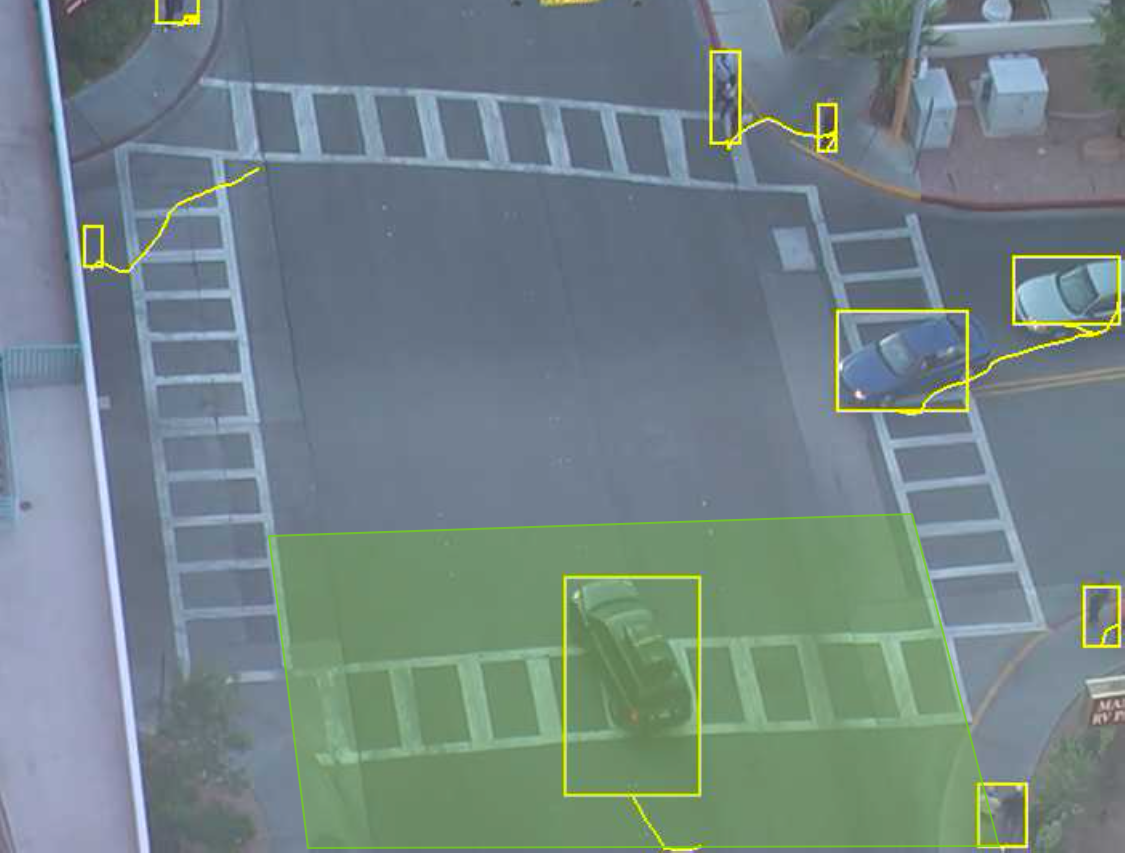
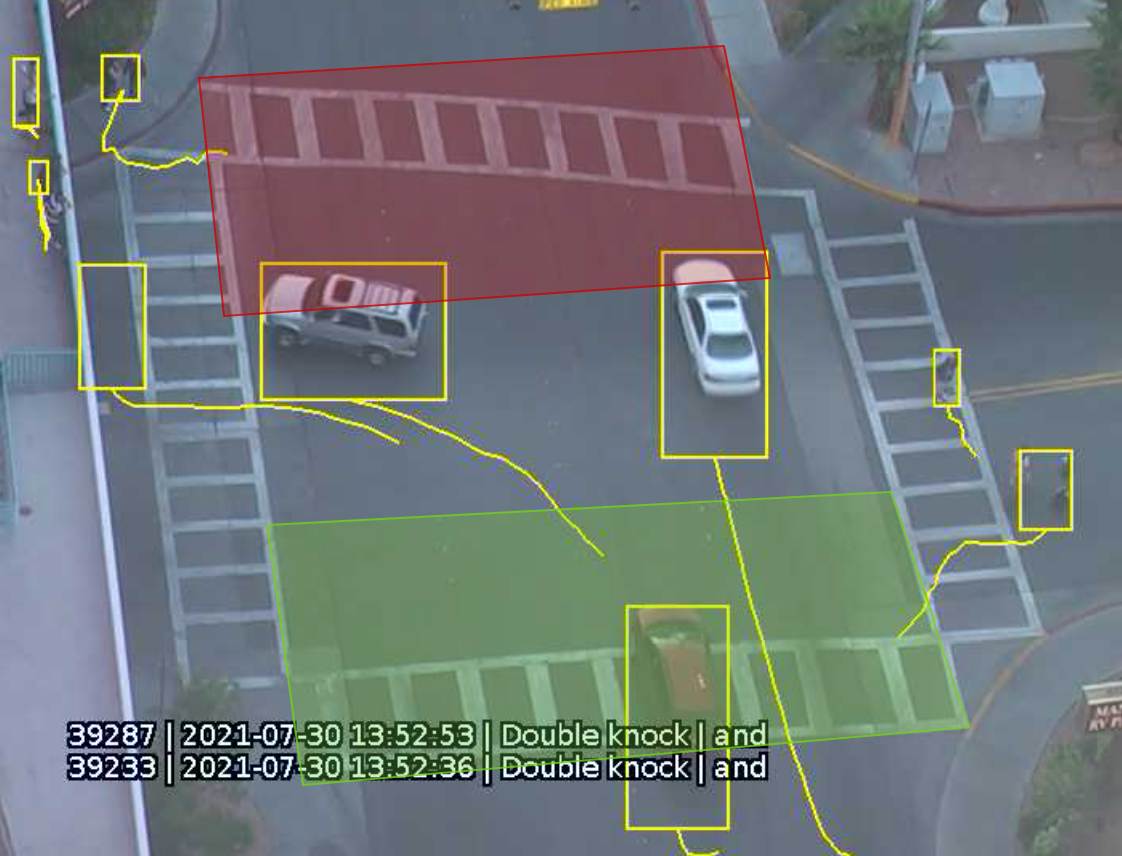
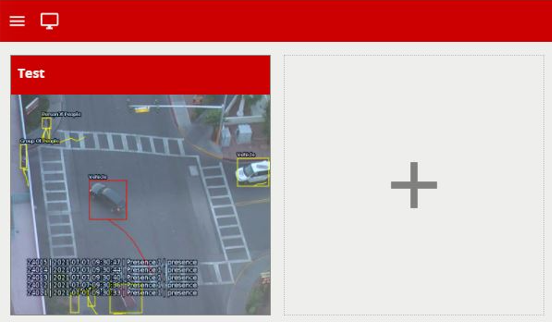
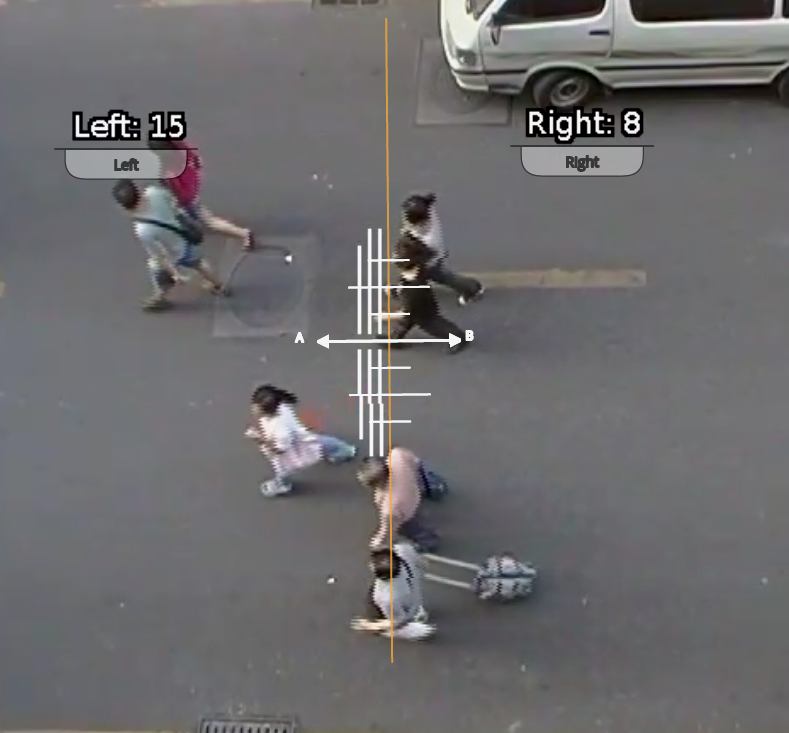
Here you can see the Double knock rule in action, the two white vehicles have driven from the first zone and entered into the second zone.
When the object enters into the second zone, an event will trigger ‘Double Knock effect’ as you can see from the example pictured below.
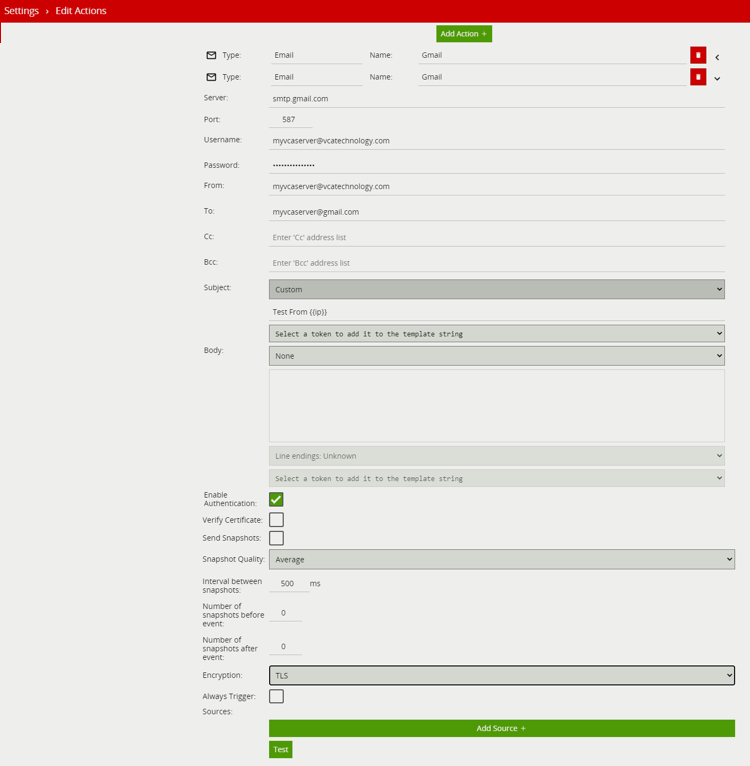
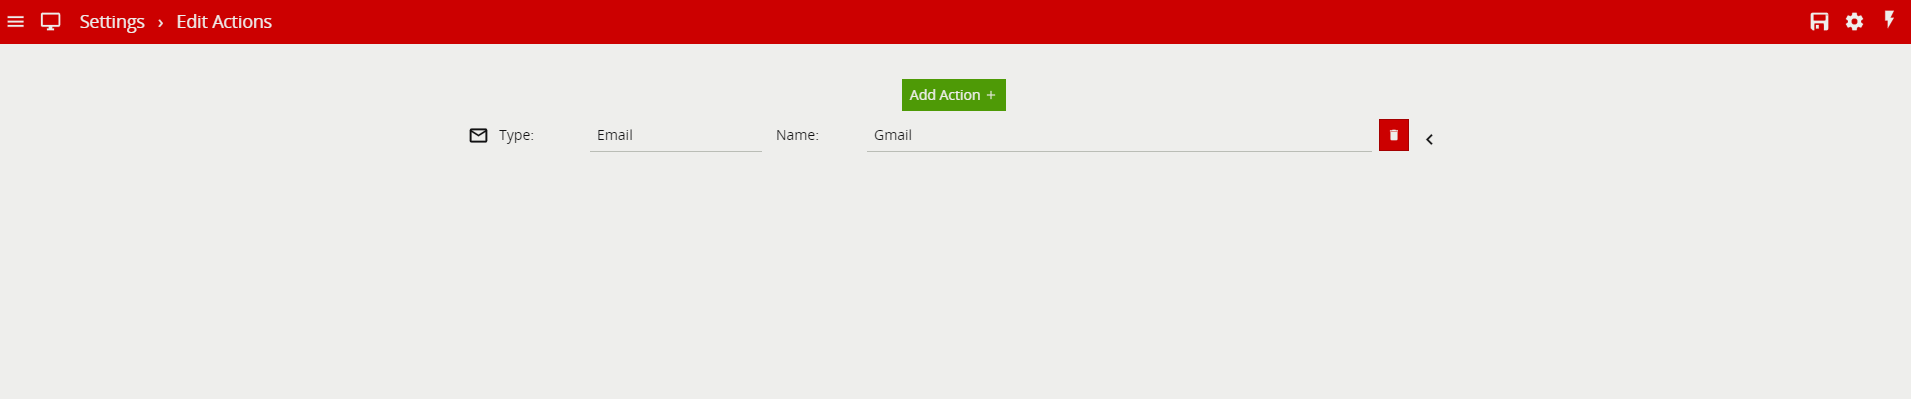
Note: A paid Gmail service is required for this example to work. Please refer to your SMTP server documentation for specific SMTP service requirements.
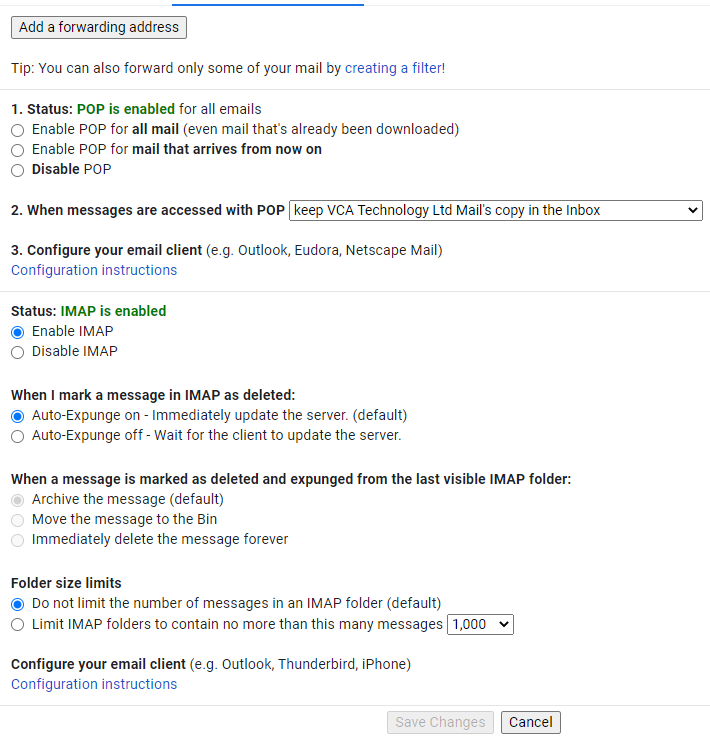
Configure your POP/IMAP settings.
To turn off 2 Step Verification.

It is possible to reset counters (and other settings) in VCAserver using the HTTP action to send REST API commands. Further details of the REST API commands can be found in the integration documentation.
To achieve this, you will perform the following:
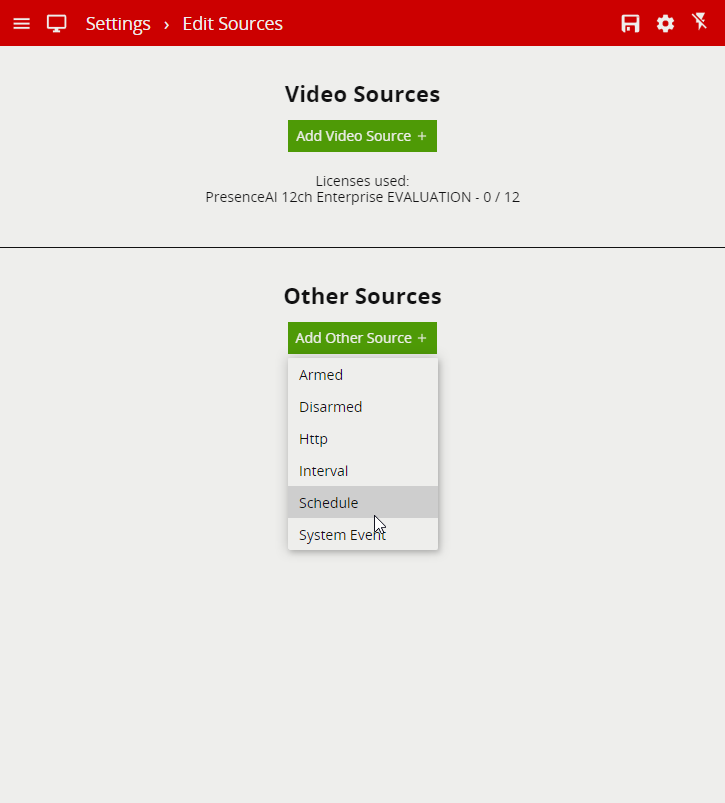

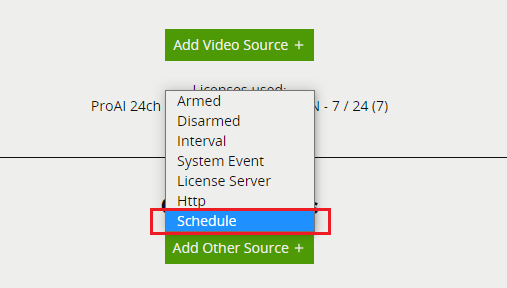
The Schedule option available in the Other Sources feature allows the user to define the period of time events will be created. Alternatively, it can be configured to control the system state of VCAserver.
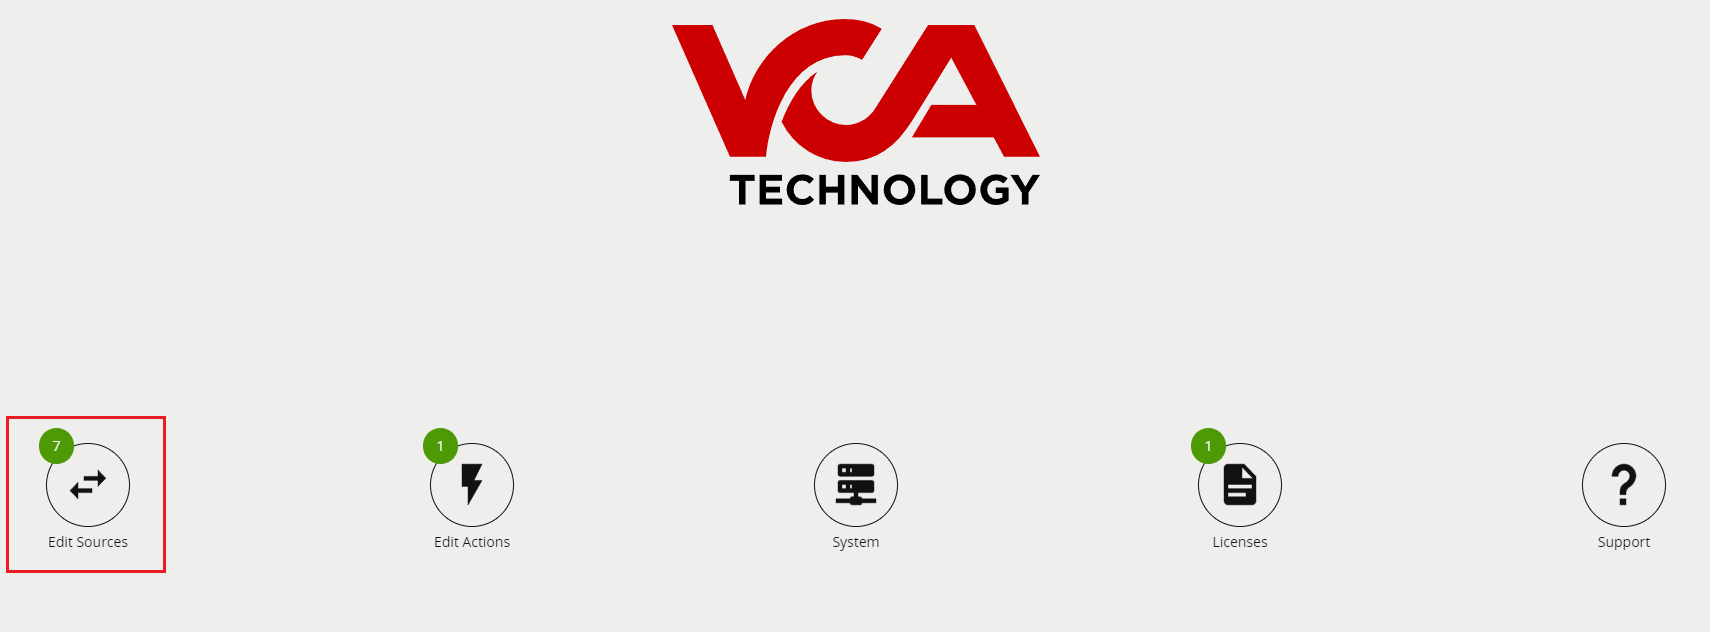
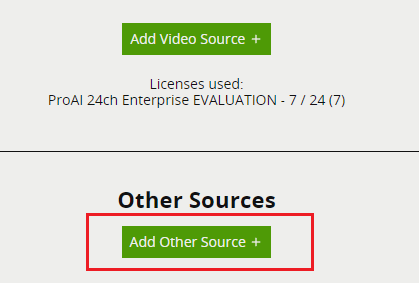
Under Other Sources, click on Add Other Source
Expand the black arrow on the right to see the full Schedule layout
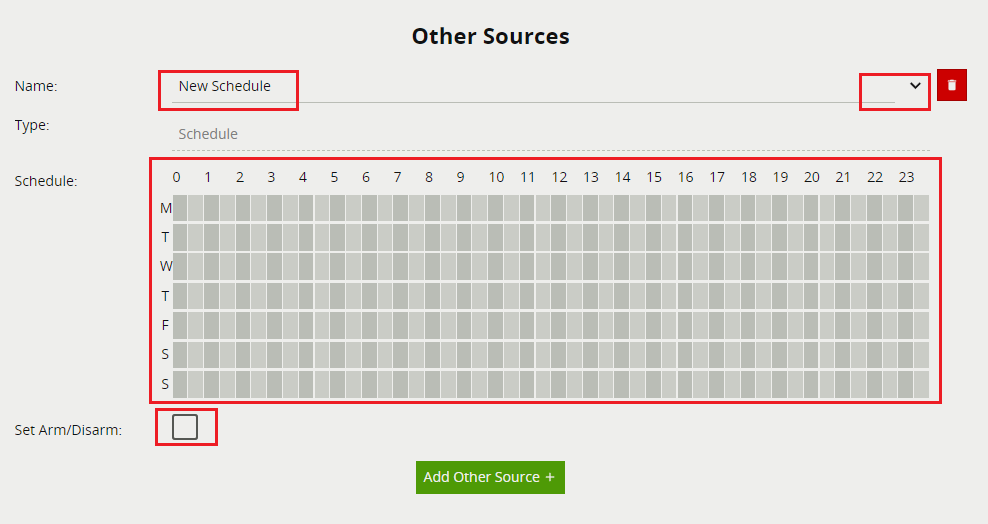
Your schedule is now created
To link your Schedule to a Rule please refer to are FAQ on FAQ - How do I link schedules to my rules so I only receive events according to the schedule
For further information on Schedule please refer to our VCA Documentation - Schedule
The Schedule can be link to your rule to control when events are produced, use the Source filter to link the rule to the schedule.
In order to link schedules to rules you need to create a schedule task
For more information and a guide on how to create a schedule please refer to our FAQ document on How do I create a schedule in VCAserver
*Note: To link a schedule to your rule you will need to add and link a Source Filter to a rule.
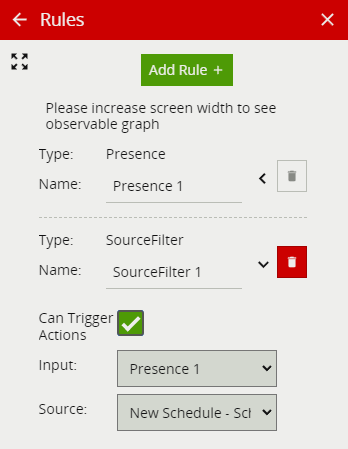
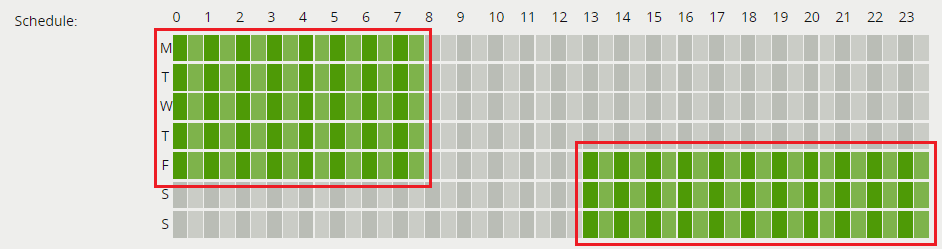
*Note: Your schedule task needs to have an active day and time for your event action to be triggered to only receive events according to the schedule (see the below image).
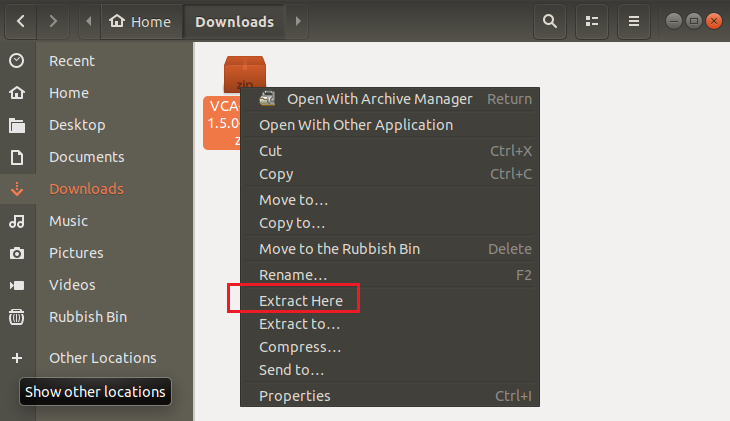
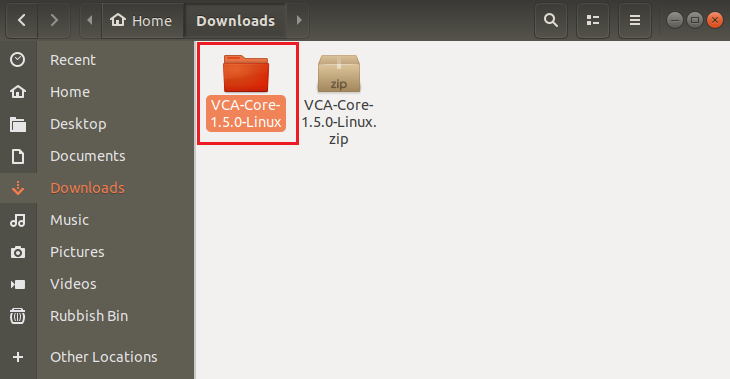
After receiving a zip file that contains the license’s tokens, you need to unzip it and follow the steps in de PDF or the steps below:
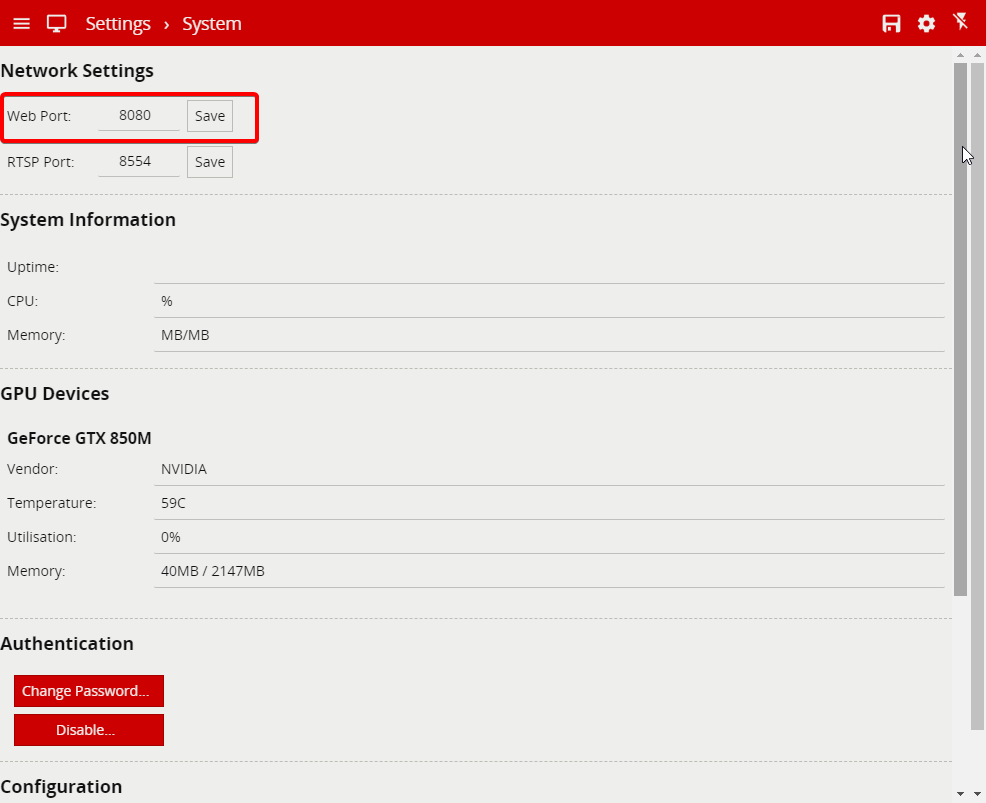
To change the the recovery port used in VCAserver.
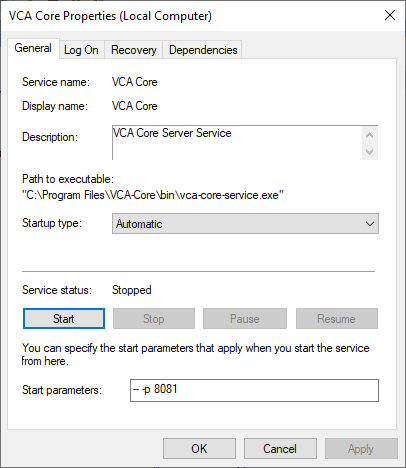
-p 9090 -- -p 8080 where 9090 is the recovery port and 8080 is the web port you want VCAserver to bind to. You can change the last digit on the recovery port, for example -p 9091. Once defined, click the Start button to start the service with these settings.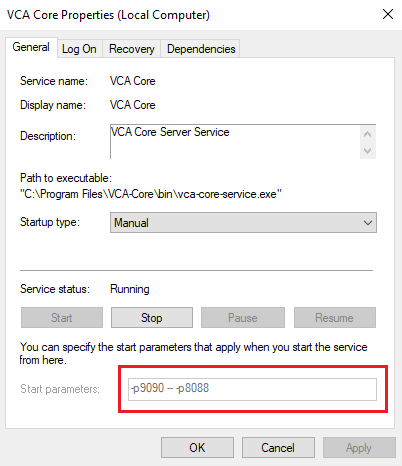
After doing this once, the service will use the new port that you have assigned
Note: After entering the new Start Parameters, don’t click OK because it will delete it, you must first click on Start under the Service status, after you have Started the Parameters then you can click on OK.
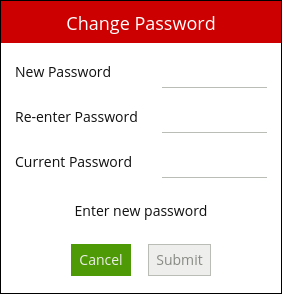
To change The default password for VCAserver please follow the guide below
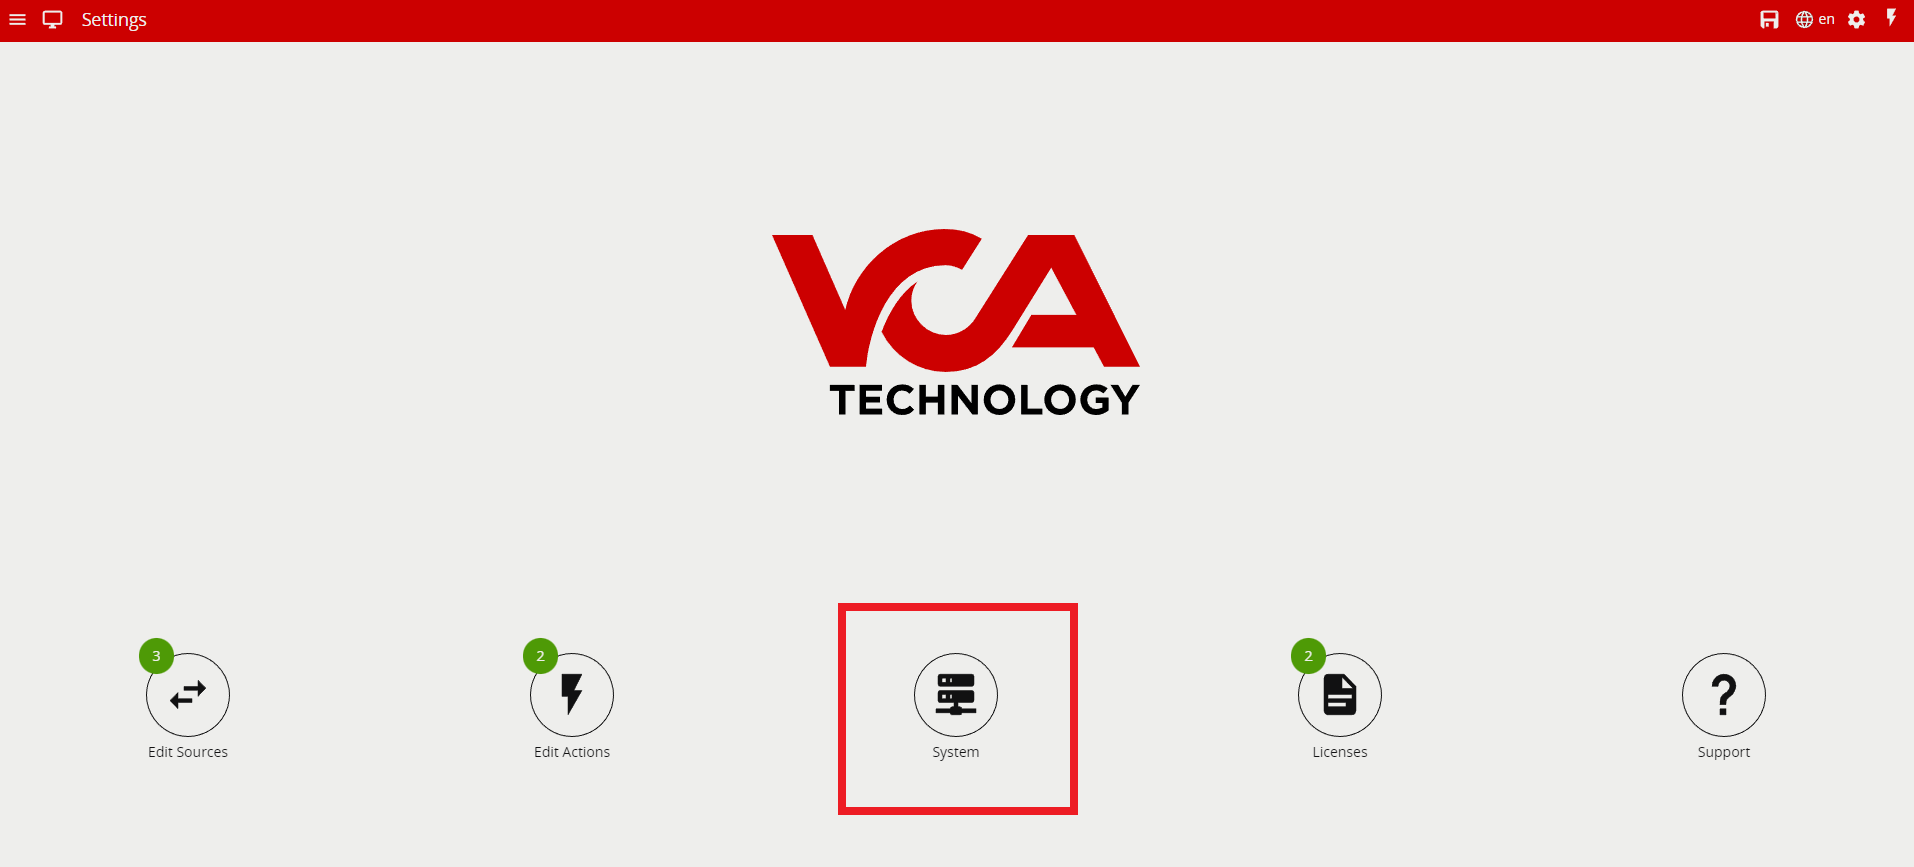

Enter the new password, and confirm the current password in order to apply the changes.
Please refer to the VCAserver documentation for more information on Authentication Settings and Disabling Authentication
The user is able to customize the appearance and colours for the VCAserver UI, to do this please refer to the VCAserver documentation for more information on Theming VCAserver
If you have forgotten your password and VCAserver becomes inaccessible, the only way to recover access to the device is to delete the configuration file VCAserver is using. This process differs between platforms:
C:\VCACore\configuration/var/opt/VCA-Core/WARNING: This will clear down the VCAserver configuration, please make sure you have a valid backup before continuing.
Please refer to the VCAserver documentation for more information on Authentication Settings
This can be a reference to two areas, it could be an issue with licensing or calibration.
Please check your license to make sure there is a valid license that covers the use of the filters.
When using the Object Tracker, the channel must be calibrated for the Object and Speed classification filter to be available to use.
Camera calibration is required in order for VCAserver to classify objects into different object classes. Once the channel has been calibrated, VCAserver can infer real-world object properties such as speed, height, and area and classify objects accordingly.
Camera calibration is split into the following sub-topics:
To enable calibration in VCAserver please see images below:
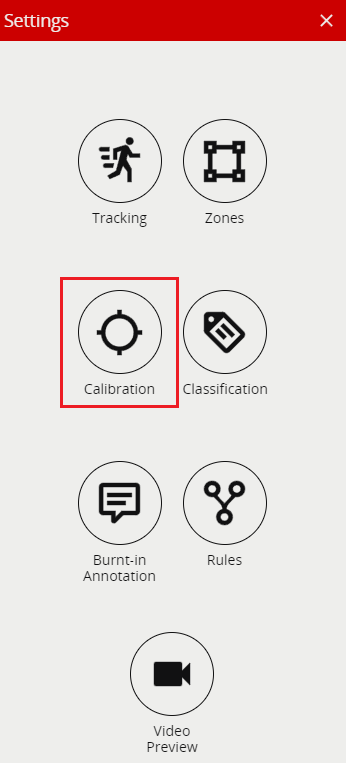
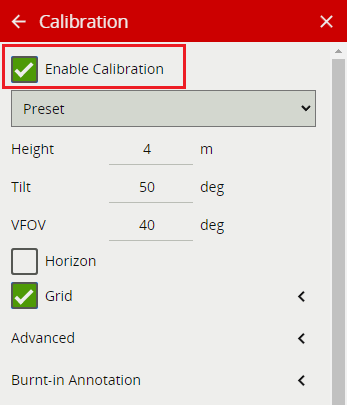
Note: Calibration is a licensing feature, you will need a valid license to make the calibration work.
For more information please refer to the section titled Calibration in the VCAserver documentation.
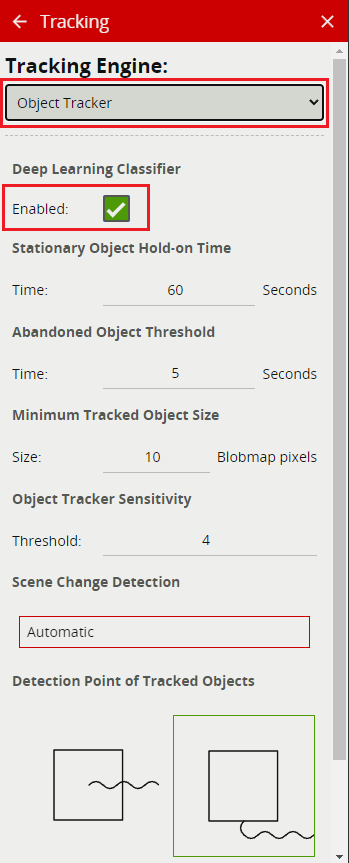
Your Deep Learning Classifier is now activated and ready to be used.
To learn how to filter objects, Please refer to the VCAserver documentation titled Object Filter for more information.
Objects are filtered using the Object Filter rule against the channel. Please refer to the VCAserver documentation titled Object Filter for more information.
There are a number of factors that account for a high CPU usage when using VCAserver.
Note: We recommend using the top-of-the-line, latest range of CPU’s.
The CPU specification affects the number of channels you can have, Please refer to the VCA hardware requirements Hardware Requirements
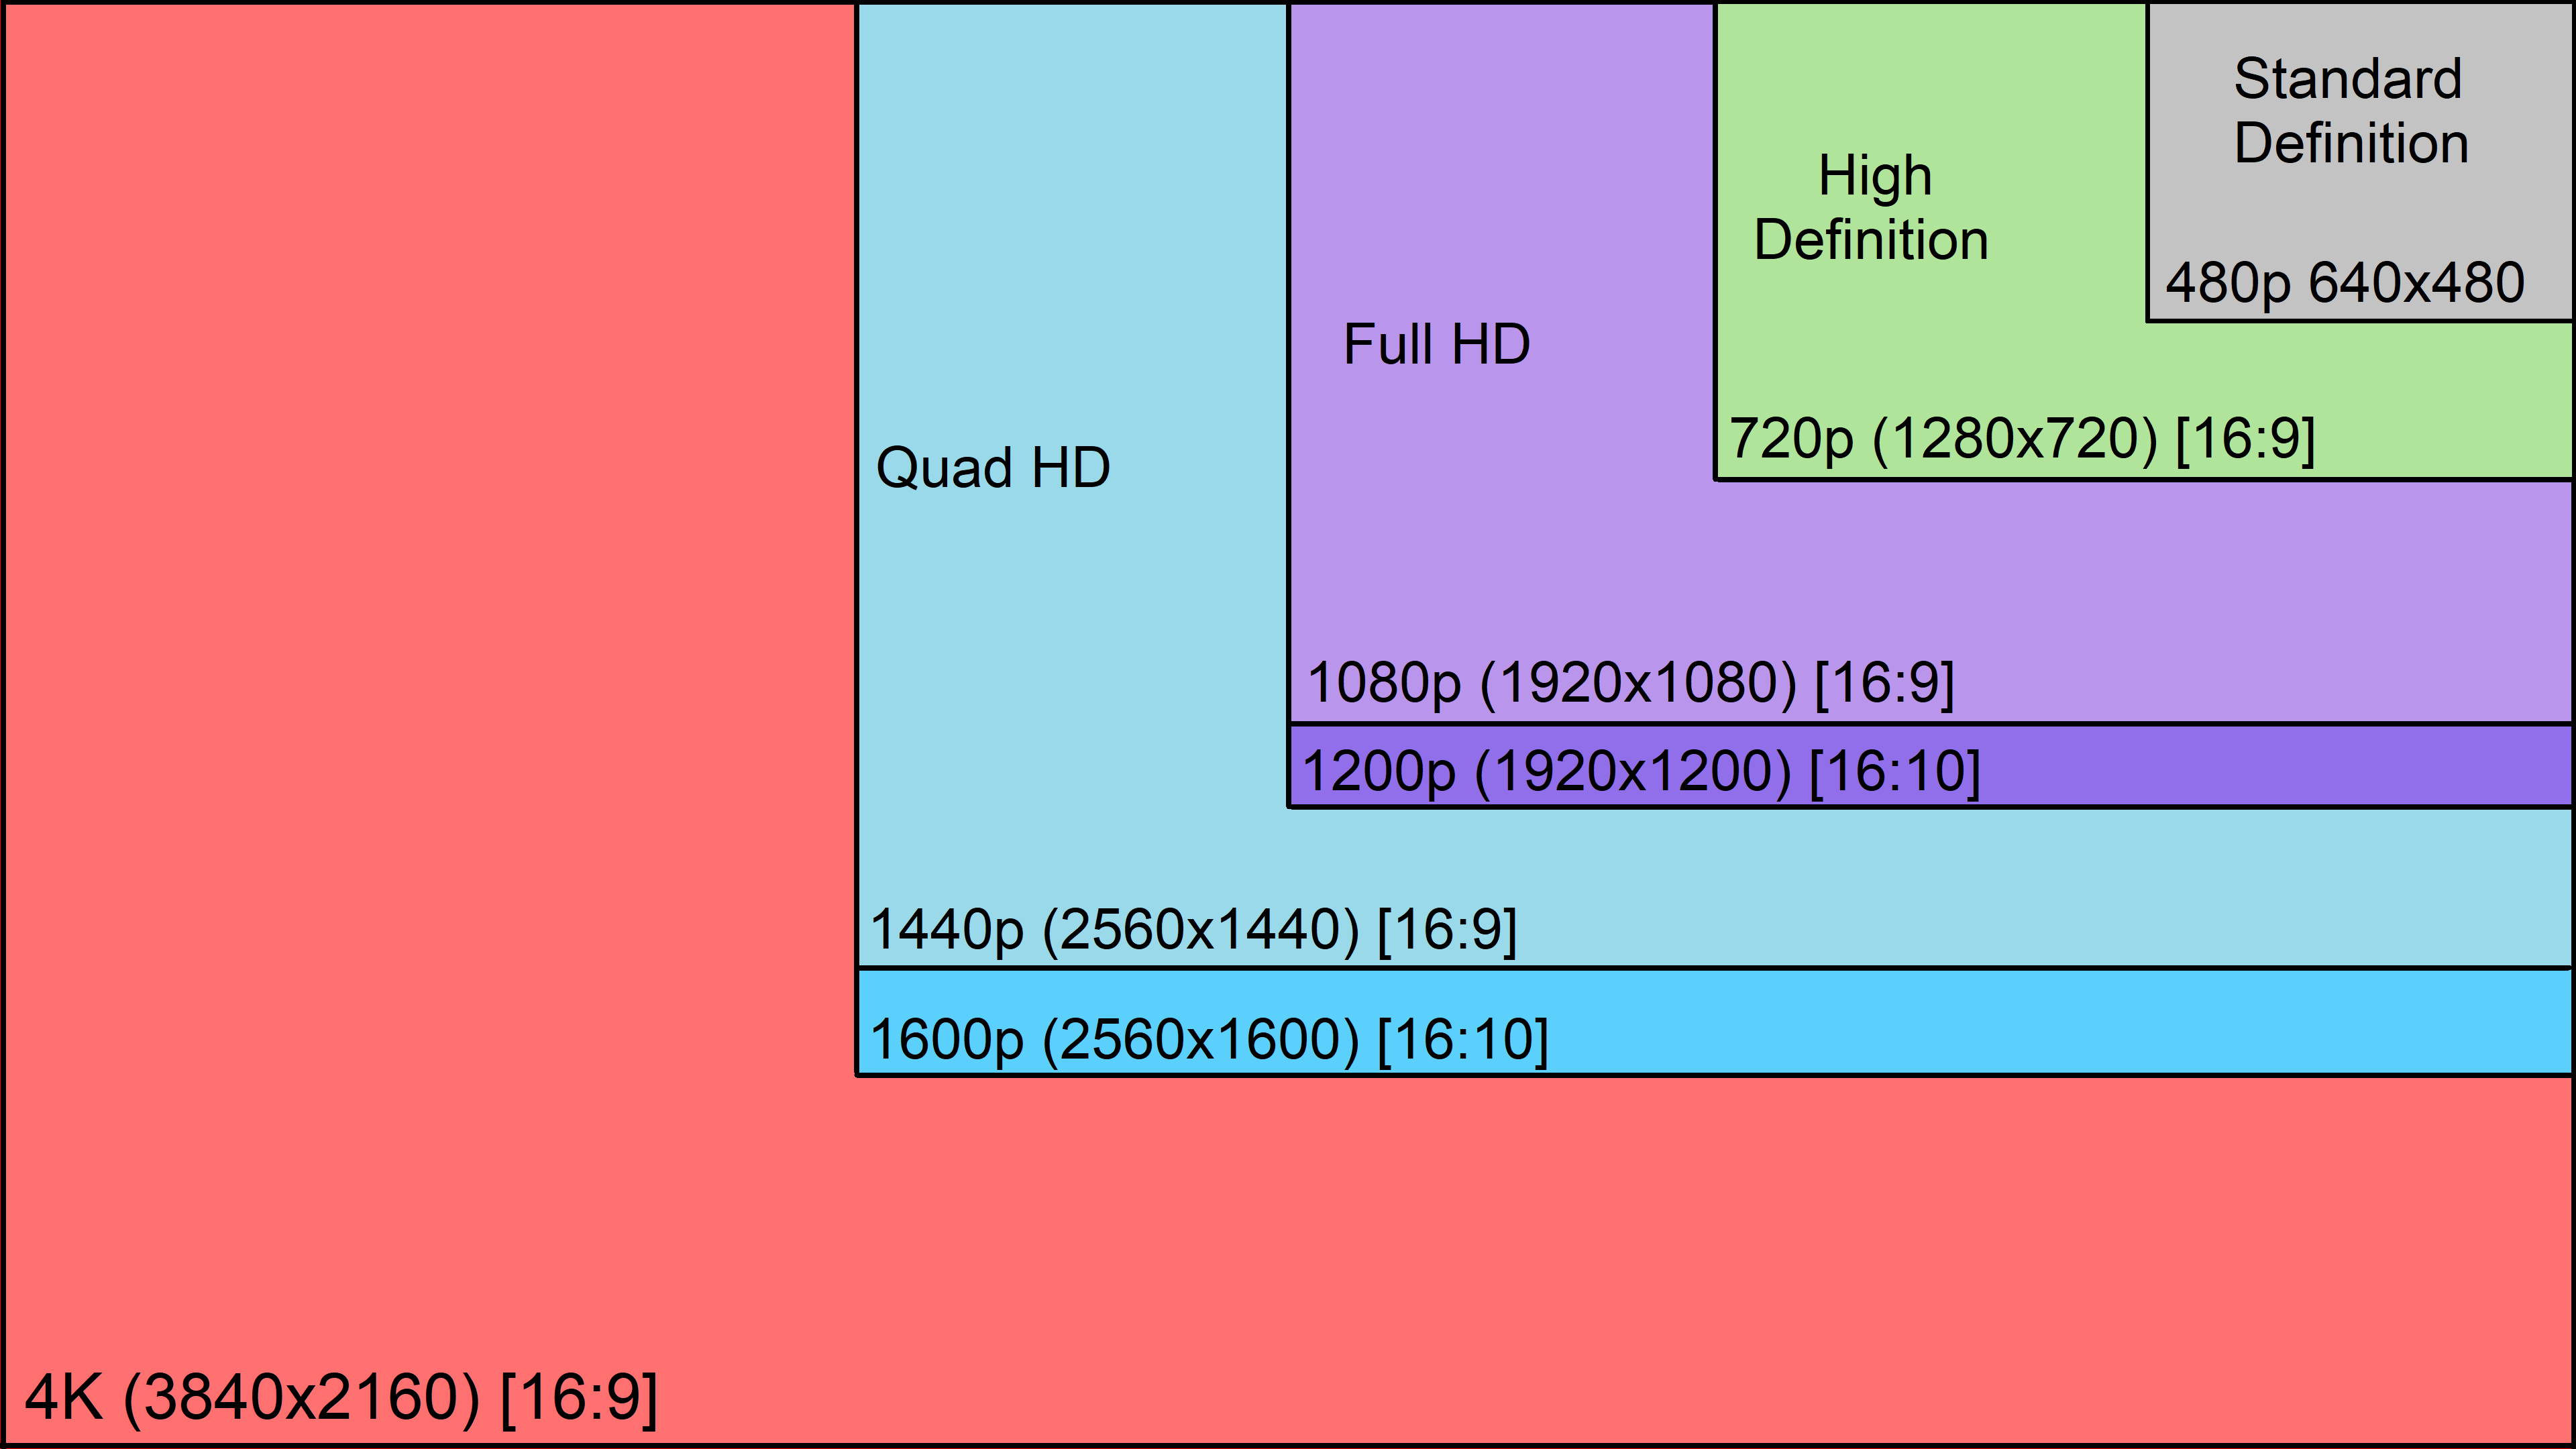
We recommend an optimal incoming resolution of 640 x 480 and a frame rate of 15 FPS.
VCAserver will process most resolutions and frame rates but changes from the optimal recommended will impact how your hardware resources are used. The higher the resolution, the more resource is required to decode the frames. The same is true for the frame rate.
The diagram below illustrates the difference. In order to process a 1080 resolution camera, we will use 3-4 times the resource compared to a 640 resolution. When you have multiple RTSP channels you can quickly see how the resource usage can be affected.
VCAserver licences are linked to the hardware of the system, so if the hardware changes your license will become invalid and you will need to request a new one. Please contact your software distributor for further information.
You can use the following web form to request a replacement license Relicensing, this may incur a charge to complete.
VCAserver can be used in a virtual environment but it will require a VCAserver loaded onto a bare-metal system to act as the licensing server.
This is because VCAserver works by using a hardware code to validate the licenses and lock them to a physical system. You can find more details about virtual licensing in the VCAserver documentation Licensing.
If you are not in the position to use an RTSP source then you can add your own video files to represent the scenarios you want to assess.
Note: Recommended file format is MP4 / AVI, recommended H.264 video codec.
To make your video file accessible you will have to copy the file into the test-clips folder of the VCAcore program directory.
test-clips folder.Windows: C:\VCACore\test-clipsLinux: /var/opt/VCA-Core/test-clipstest-clips folder for Windows / Linux.Windows: C:\VCACore\test-clips
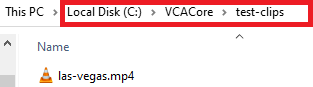
Linux: /var/opt/VCA-Core/test-clips

Click on the + sign in the camera matrix preview page.
Click on Add Video Source and select file:
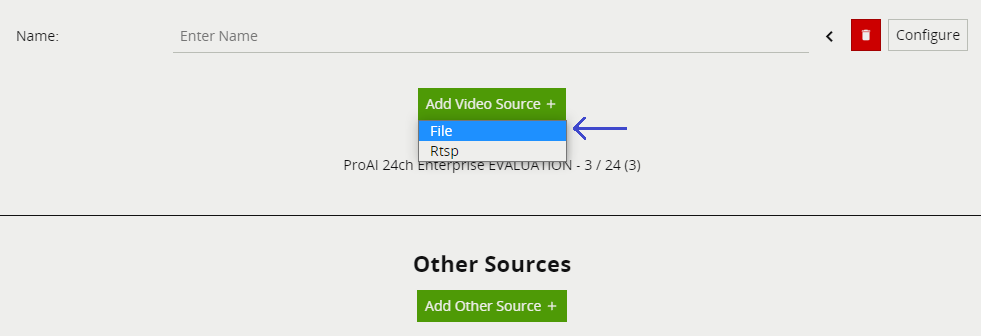
Your video file will be available to select.
Note: If you don’t see your video file in the list then go back and double-check that you’ve placed the video file in the testclips folder and also make sure it is in the right MP4 or AVI format.
Please refer to the VCAserver documentation for details on how to use the video analytic features: VCA Documentation.
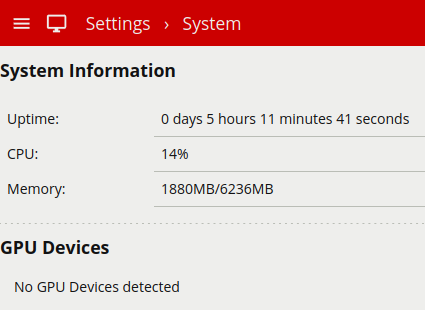
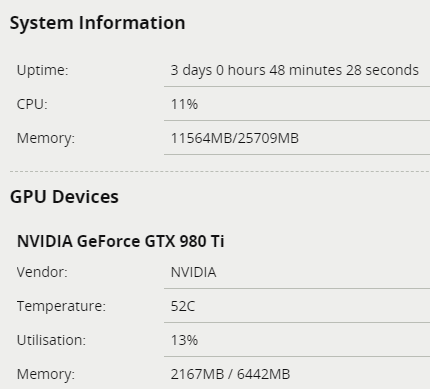
If your VCAserver has not detected the graphics card GPU that you have installed, then you should check the following.
The DL features of VCAserver require a Nvidia GPU with a compute capability of 7.5 or higher. Please refer to the VCAserver documentation for more information VCA Documentation.
Ensure you have the latest GPU drivers from the Nvidia website.
Ensure you have the correct CUDA Toolkit installed. Please refer to the VCAserver documentation for more information VCA Documentation.
No graphics card detected under GPU Devices and Deep Learning Tracking features are blanked out and not accessible to use.
Compatible GPU’s are defined as GPU’s that are manufactured by Nvidia to support the CUDA Toolkit. Please refer to the deep learning requirements section in the document VCAserver user guide for further details.
Refer to our VCA hardware requirements document Hardware requirements for details on CPU and GPU channel capacities.
Download the install the latest GPU drivers from Nvidia’s website.
Confirm the correct version of the CUDA Toolkit is installed, links are available from the VCAserver website download page.

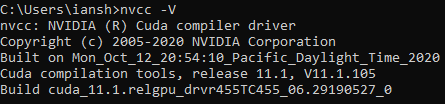
After you have updated your Nvidia GPU drivers and CUDA Toolkit**, you can confirm that it has been installed successfully by checking the Drivers and CUDA Version from a command line/terminal window.
Driver Version: nvidia-smi
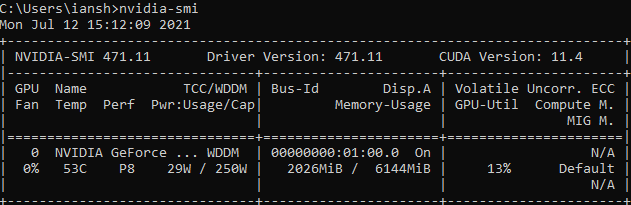
CUDA Toolkit: nvcc -V
After any update, restart the system to apply the changes.
Check to see if your graphics card has now been detected in VCAserver under GPU Devices.

Ensure you have the correct license to support the features you are trying to use.
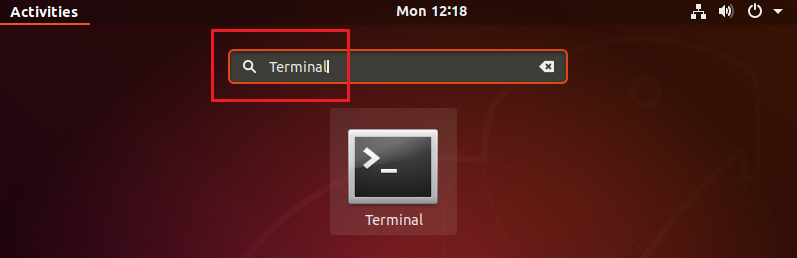
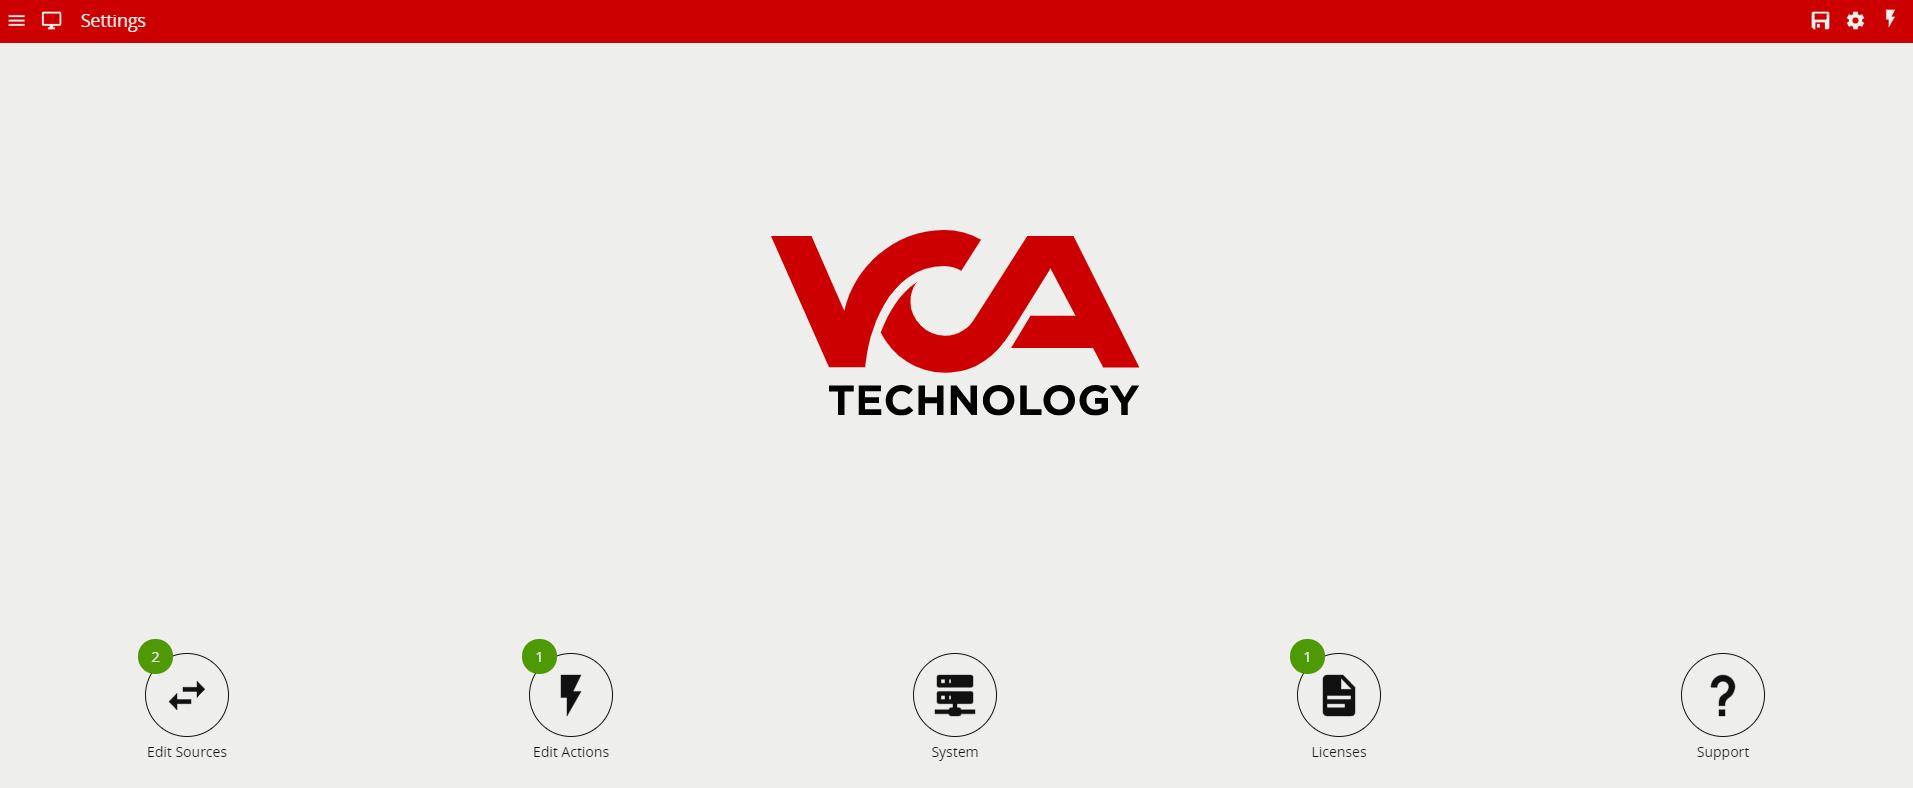
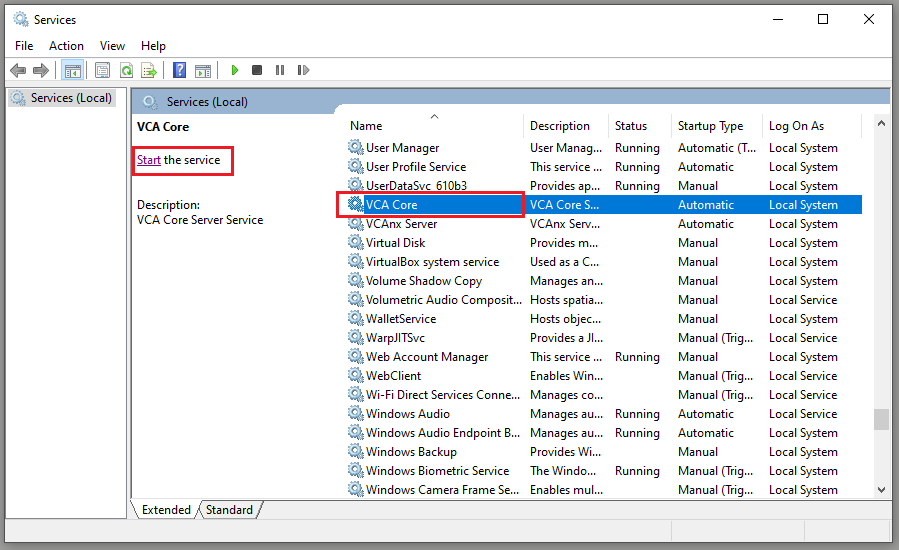
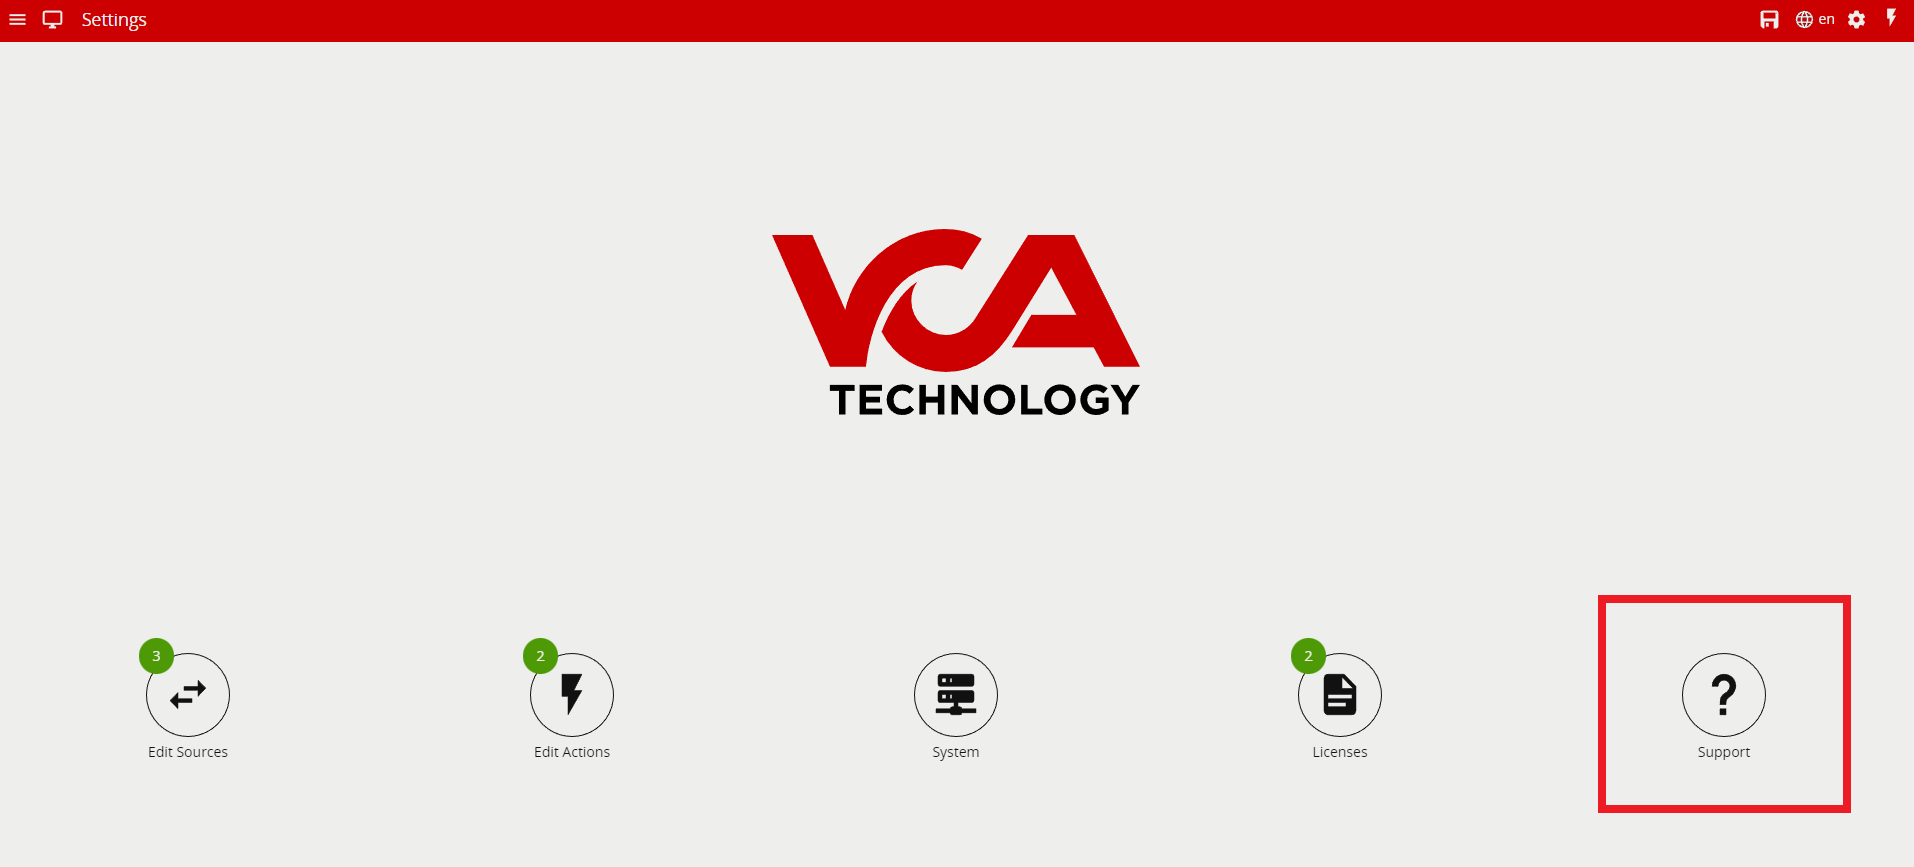
VCAserver runs as a service. It does not create a desktop icon or shortcuts so it might be confusing where to locate and open it once the installation process has been completed.
These are the steps to open and use VCAserver after installing:
Open a browser window. VCAserver is supported by Chromium browsers, including Google Chrome, Microsoft Edge, Brave, Epic, Opera or Vivaldi.
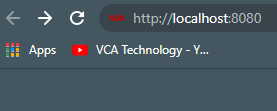
Assuming it is installed locally, type http://localhost:8080. You can also use http://127.0.0.1:8080.
Enter the username and password when prompted. Please refer to the VCAserver documentation for more details VCA Documentation.
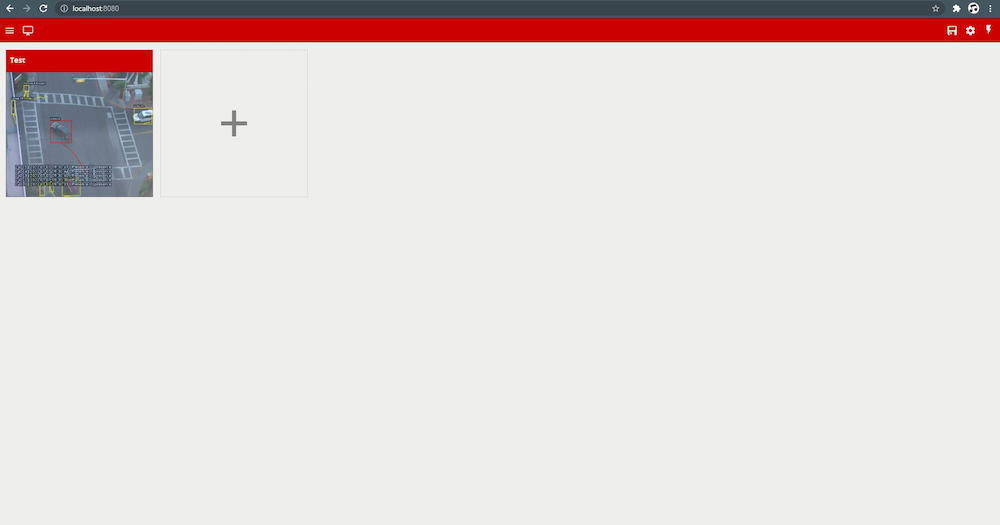
Your VCAserver instance will now open and ready to be used.
Open your internet browser.

If locally installed, you can use http://localhost:8080. or http://127.0.0.1:8080, if accessing a remote instance of VCAserver then use the IP address or network name with port 8080.
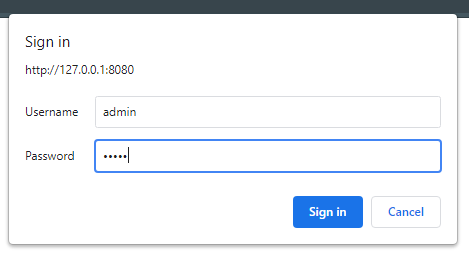
When the box appears, type the username: admin and password: admin.
The VCAserver is now up and running, ready to be used.
The first step is reviewing the type of license you have installed. If the license is not the correct one, you can apply for a new license that contains all the features (for instance a PRO license). If the license is correct, you should validate that you are not using a Virtual machine or that the license server settings are correct.
You can refer to our documentation for more information on licensing
The most common causes are:
The DL filter is constantly being improved to support different environments and can work with thermal cameras. If further development is required then we can work with you to achieve the results you require.
There are two ways of achieving this.
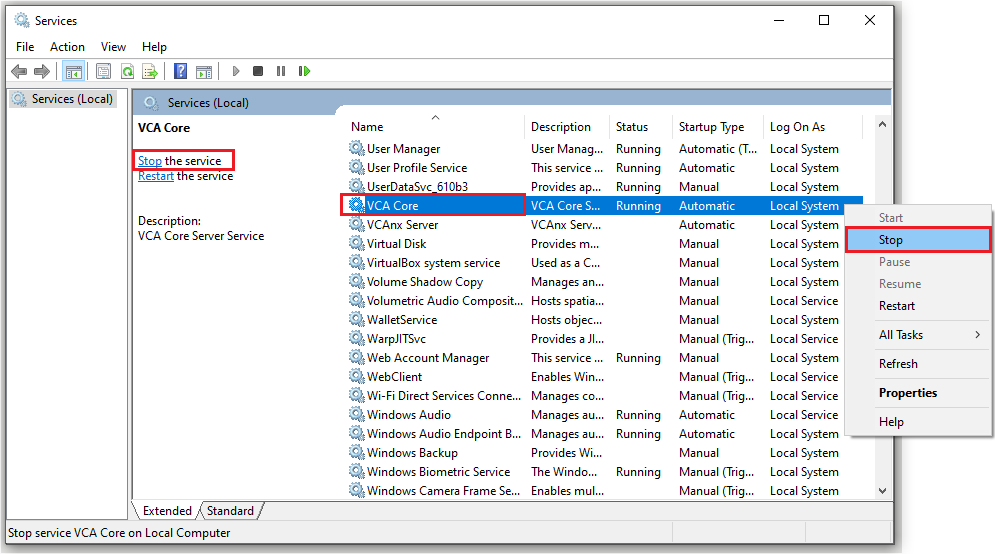
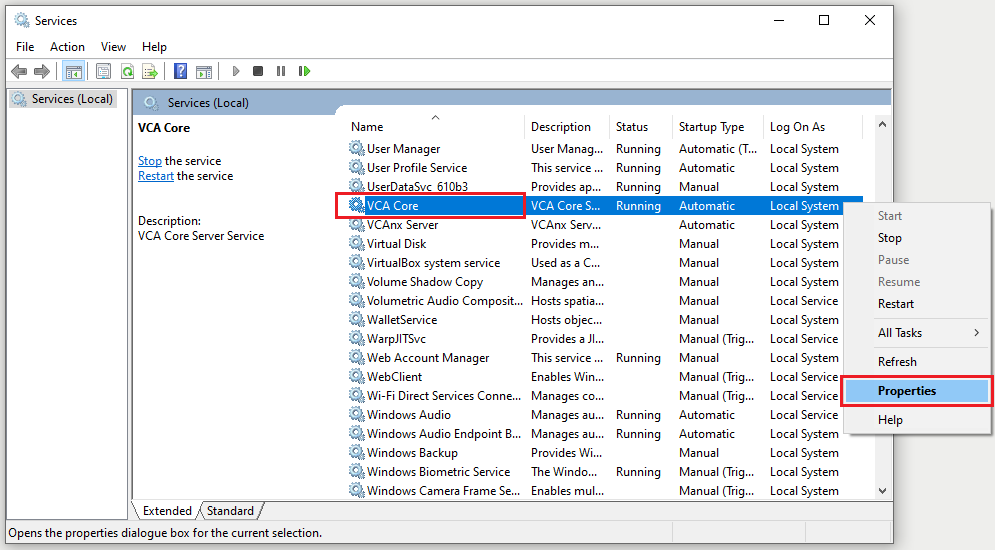
Web Interface
services.msc to open the Services Manager.– -p <the new web port> in the Start parameters box. (See picture example)Service Start up Parameters
No, you cannot. Our evaluation licensing model lasts 45 days.
The Deep Learning Object Tracker is designed for accurate detection and tracking of people, vehicles, and key objects in challenging environments. The deep learning object tracker will assess every frame from a channel, Its job is to classify and track objects in the scene. Because it uses Deep Learning features it requires a GPU for it to work. It also has a high GPU usage profile and can only support a limited number of channels. Using high-resolution video and frame rates will also result in high CPU overhead and can cause a reduction in channel capacity.
The systems hardware specification will depend on how many channels of Deep Learning People Tracker can be used. For more information Please refer to our Hardware Requirements
Note: Before you can use a channel with the Deep Learning Object Tracker you will need to add licenses. The license will control what features are available against a channel.
For further information on the Deep Learning Object Tracker and licenses. Please refer to our VCA Documentation
The Deep Learning People Tracker uses deep learning features to look for multiple key points that form a skeleton of a person and will assess every frame from a channel. The tracker identifies the characterizes of a person and tracks the person through the scene. It has a high GPU usage profile and this would limit the number of channels that can be used. Using high-resolution video and frame rate might also result in high CPU overhead and can cause a reduction in channel capacity.
The system’s hardware specification will depend on how many channels of Deep Learning People Tracker can be used. For more information please refer to our Hardware Requirements
Note: Before you can use a channel with the Deep Learning People Tracker you will need to add licenses. The license will control what features are available against a channel.
For further information on the Deep Learning People Tracker and licenses. Please refer to our VCA Documentation
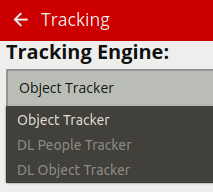
VCAserver supports a number of tracker technologies for use with a configured channel of video and all the trackers can be used simultaneously on the same system.
Each of the trackers behaves differently from the other. For further information on how each tracker works please refer to our VCA Documentation
A Non-detection zone specifies an area that should be excluded from VCAserver analysis. Objects are not detected in non-detection zones. Useful for excluding areas of potential nuisance alarms from a scene (e.g. waving trees, flashing lights, etc).
Note: A Non-Detection Zone does not effect your tracking or the objects being picked up.
We suggest that the non-detection zone does not overlap with your active zones because it would confuse the trackers. You can have them very close to each other and the trackers will work as normal. The non-detection zone needs to be around 1-2 meters apart from your active zone.

29.97...Certain RTSP clients misrepresent the frame rate of a VCAserver RTSP stream when the openh264 (CPU) encoder is used. Specifically, VLC Media PLayer will report the FPS as 29.97.... The actual frame rate will always match the channel source.
Yes, VCAserver will work on all Windows Server operating systems.
Firefox can be used to access VCAserver, VCAserver is supported by many browsers, including Google Chrome, Microsoft Edge, Brave, Epic, Opera or Vivaldi and more.
For further information on browsers please refer to our FAQ Documentation
The range of video codecs supported by VCAserver is given below.
Note: where supported, the following H.264 profiles can be decoded using hardware acceleration: ConstrainedBaseline, Main, High, MultiviewHigh and StereoHigh
For further information please refer to our FAQ Documentation
When using an RTSP stream as a source please ensure it is encoded with one of the supported compression formats. Likewise, when using a file as a source please note that VCAserver is compatible with many video file containers like MP4 and AVI etc. but the video file itself must be encoded with one of the supported compression formats below.
Note: Recommended file format is MP4 / AVI, recommended H.264 video codec.
For further information please refer to our FAQ Documentation
The physical locations for VCAserver log files are different on Windows and Linux
VCAserver log files can be found in
Windows: C:/VCACore/logs
Linux: var/opt/VCA-Core/logs
The logs can also be accessed via the Web UI
All the things that VCAserver stores on the disk are
To know where all the file are individually located, please refer to the VCAserver documentation for more information File Locations
There are two ways of achieving this.

Windows: Program Files/VCA-Core/version.txt
Linux: opt/VCA-Core/version.txt
No, VCAserver does not have a shake cancellation feature.
The table below shows all the supported features that comes with each license.
| License/Features | Count | Count Ai | Presence | Presence Ai | Pro | Pro Ai |
|---|---|---|---|---|---|---|
| Zones | Yes | Yes | Yes | Yes | Yes | Yes |
| Object Tracker | Yes | Yes | Yes | Yes | ||
| DL Object Tracker | Yes | |||||
| DL People Tracker | Yes | Yes | ||||
| 3D Calibration | Yes | Yes | ||||
| Abandoned Object | Yes | Yes | ||||
| Appear | Yes | Yes | ||||
| Counting | Yes | Yes | Yes | Yes | ||
| Counting Lines | Yes | Yes | Yes | Yes | ||
| Direction | Yes | Yes | Yes | |||
| Disappear | Yes | Yes | ||||
| Dwell | Yes | Yes | Yes | |||
| Enter | Yes | Yes | ||||
| Exit | Yes | Yes | ||||
| Face Detection | Yes | Yes | ||||
| Presence | Yes | Yes | Yes | Yes | Yes | |
| Stopped | Yes | Yes | ||||
| Tailgating | Yes | Yes | ||||
| Tamper Detection | Yes | Yes | Yes | Yes | ||
| Logical Rules | Yes | Yes | ||||
| Colour Filter | Yes | Yes | ||||
| DL Filter | Yes | Yes | ||||
| Object Filter | Yes | Yes | Yes | Yes | ||
| Source Filter | Yes | Yes | Yes | Yes | ||
| Speed Filter | Yes | Yes | Yes | Yes | ||
| Meta Data | Yes | Yes | Yes | Yes |
AMD GPUs do not support the NVIDIA CUDA toolkit, the DL features in VCAserver currently utilize the CUDA toolkit to access the NVIDIA GPU features.
Please refer to the VCA Hardware Requirements for more information.
The calibration 3D mimics in VCAserver are used for verifying the size of a person in the scene and are 1.8 metres tall. The mimics can be moved around the scene to line up with people (or objects which are of a known, comparable height) to a person.
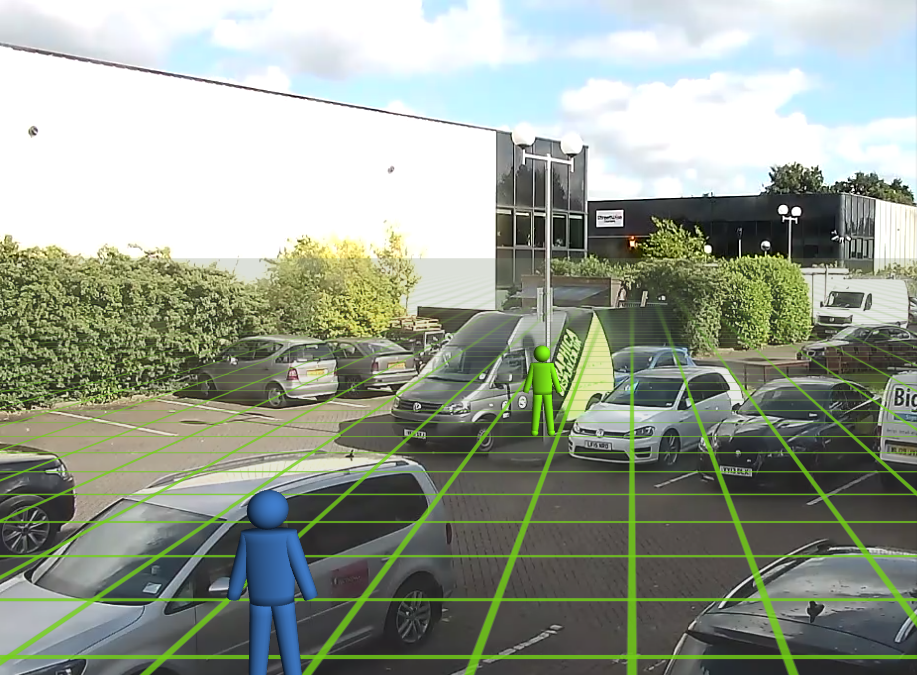
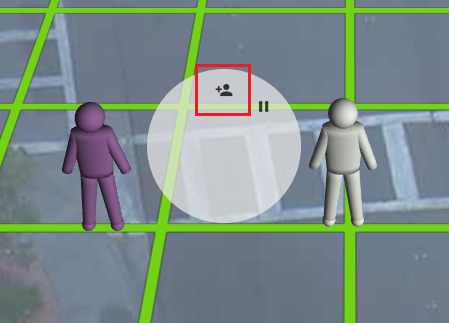
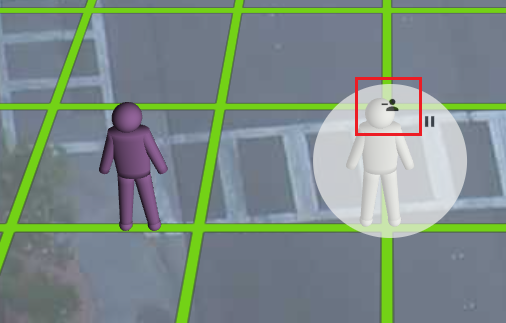
You can add or remove 3D mimics when calibrating your scene. To add or remove 3D mimics please see the image guide below.
For more information please refer to the section titled Calibration in the VCAserver documentation.
The Deep Learning Object Tracker is designed for accurate detection and tracking of people, vehicles and key objects in challenging environments where motion based tracking methods would struggle.
For more information please refer to the section titled Confidence Classification in the VCAserver integration documentation.
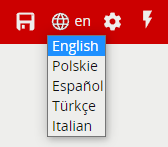
VCAserver has a range of different languages to choose from.
Note: The default language is set to English

The calibration feature can be enabled on all trackers. See the list below of all supported trackers.
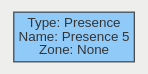
The presence rule triggers an event when an object is first detected in a particular zone.
The Presence rule encapsulates a variety of different behaviour, for example the Presence rule will trigger in the same circumstances as an Enter and Appear rule. The choice of which rule is most appropriate will be dependant on the scenario.

Please refer to our documentation and YouTube video on the presence rule for further information.
VCA Documentation - Presence rule
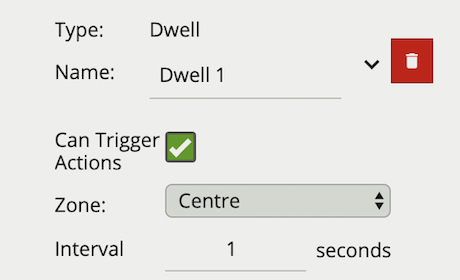
A dwell rule triggers when an object has remained in a zone for a specified amount of time. The interval parameter the time the object has to remain in the zone before an event is triggered.
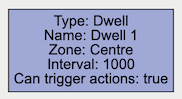
Please refer to our documentation and YouTube video on the dwell rule for further information.
VCA Documentation - Dwell rule
The direction rule detects objects moving in a specific direction. Configure the direction and acceptance angle by moving the arrows on the direction control widget. The primary direction is indicated by the large central arrow. The acceptance angle is the angle between the two smaller arrows.
Objects that travel in the configured direction (within the limits of the acceptance angle), through a zone or over a line, trigger the rule and raise an event.
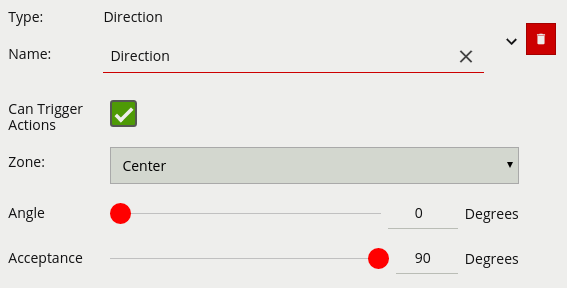
0 - 359.0 references up.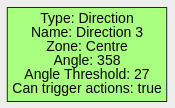
Please refer to our documentation and YouTube video on the direction rule for further information.
VCA Documentation - Direction rule
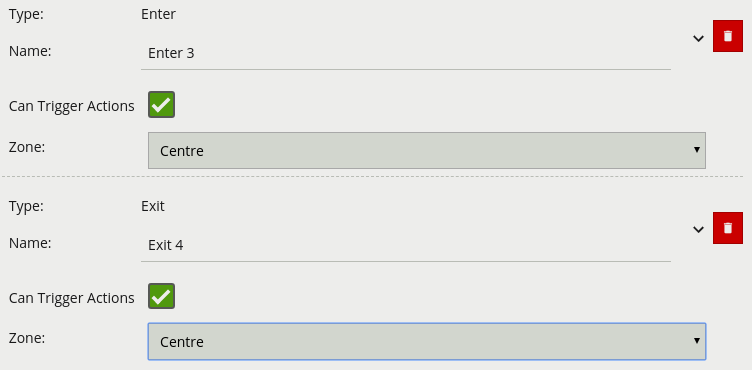
The enter rule detects when objects enter a zone. In other words, when objects cross from the outside of a zone to the inside of a zone.
Conversely, the exit rule detects when an object leaves a zone: when it crosses the border of a zone from the inside to the outside.
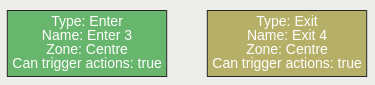
Enter: The enter rule triggers an event when an object crosses from outside a zone to inside a zone.
Exit: The exit rule triggers an event when an object crosses from inside a zone to outside a zone.
Note: Enter and exit rules differ from appear and disappear rules, as follows:
Whereas the enter rule detects already-tracked objects crossing the zone border from outside to inside, the appear rule detects objects which start being tracked within a zone (e.g. appear in the scene through a door).
Whereas the exit rule detects already-tracked objects crossing the zone border from inside to outside, the disappear rule detects objects which stop being tracked within the zone (e.g. leave the scene through a door).
Please refer to our documentation and YouTube video on the Enter and Exit rule for further information.
VCA Documentation - Enter and Exit Rule
The counting line triggers an event when movement is detected crossing the detection line in a particular direction, regardless of the angle of the crossing.
An event is generated every time an object crosses the line in the configured direction. If multiple objects cross the line together, multiple corresponding events are generated. These events can be directly used to trigger actions if the Can Trigger Actions property is checked.
A counting line is a detection filter optimized for directional object counting (e.g. people or vehicles) in busier detection scenarios. Examples of such applications may include:
NOTE: The maximum number of counting line filters that can be applied per video channel is 5.
In order to generate accurate counts, the counting line requires calibration. Unlike the object tracking function engine, this cannot be performed at a general level for the whole scene using the 3D Calibration tool. This is because the counting line is not always placed on the ground plane; it may be placed at any orientation at any location in the scene. For example, a counting line could be configured vertically with a side-on camera view.
Instead of the 3D calibration tool, the counting line has its own calibration setting. Two bars equidistant from the centre of the line represent the width of the expected object. This allows the counting line to reject noise and also count multiple objects.

To calibrate the counting line:
NOTE: if the Width slider is set to zero then the Enable width calibration checkbox is automatically disabled.
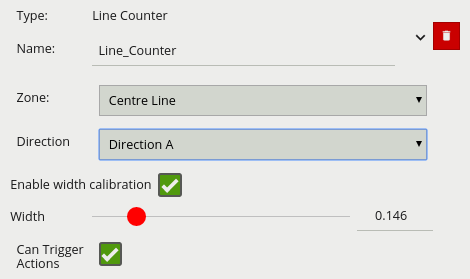
A or B direction (one direction per counting line).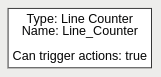
Please refer to our documentation and YouTube video on the Counting Line for further information.
VCA Documentation - Counting Line
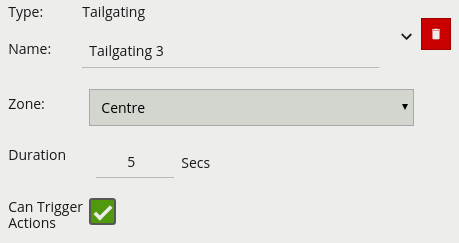
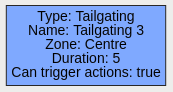
The tailgating rule triggers an event when objects cross over a line within quick succession of each other, within the defined period of time.
In this example, object 1 is about to cross a detection line. Another object (object 2) is following closely behind. The tailgating detection threshold is set to 5 seconds. That is, any object crossing the line within 5 seconds of an object having already crossed the line will trigger the object tailgating rule.
Object 2 crosses the line within 5 seconds of object 1. This triggers the tailgating filter and raises an event.
Please refer to our documentation and YouTube video on the Tailgating for further information.
VCA Documentation - Tailgating Rule
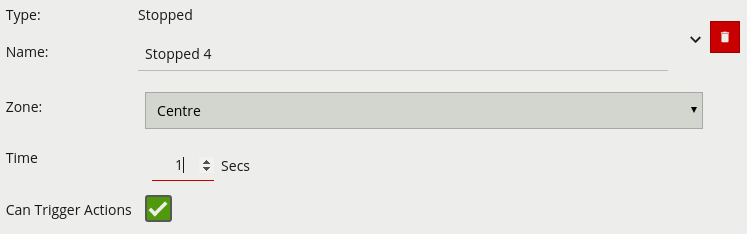
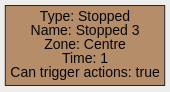
The stopped rule detects objects which are stationary inside a zone for longer than the specified amount of time. The stopped rule requires a zone to be selected before being able to configure an amount of time.
Note: The stopped rule does not detect abandoned objects. It only detects objects which have moved at some point and then become stationary.
Please refer to our documentation and YouTube video on the Stopped Rule for further information.
VCA Documentation - Stopped Rule
YouTube - Stopped Rule Coming Soon
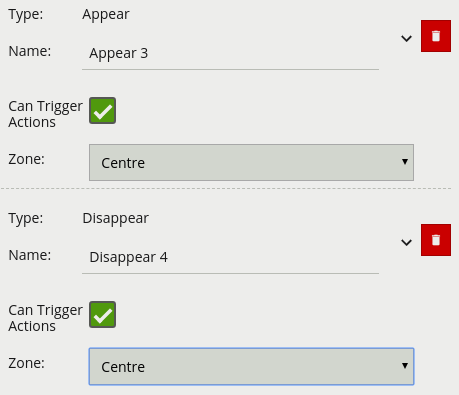
The appear rule detects objects that start being tracked within a zone, e.g. a person who appears in the scene from a doorway.
Conversely, the disappear rule detects objects that stop being tracked within a zone, e.g. a person who exits the scene through a doorway.
Note: The appear and disappear rules differ from the enter and exit rules as detailed in the enter and exit rule descriptions.

Please refer to our documentation and YouTube video on the Appear and Disappear for further information.
VCA Documentation - Appear and Disappear
YouTube - Appear and Disappear Coming Soon
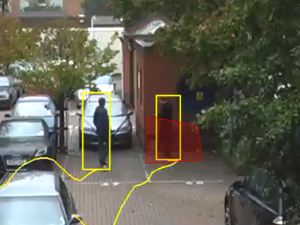
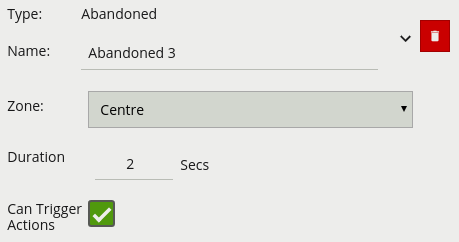
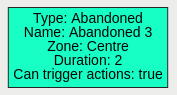
The abandoned and removed object rule triggers when an object has been either left within a defined zone. E.g. a person leaving a bag on a train platform, or when an object is removed from a defined zone. The abandoned rule has a duration property which defines the amount of time an object must have been abandoned for, or removed for, to trigger the rule.
Abandoned Object Setup 1
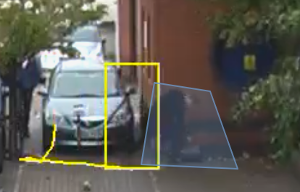
Removed Object Setup 2
Note: The algorithm used for abandoned and removed object detection is the same in each case, and therefore cannot differentiate between objects which have been abandoned or removed. This is because the algorithm only analyses how blocks of pixels change over time with respect to a background model. Note: The algorithm used for abandoned and removed object will only work when the Object Tracker is selected under Trackers
Please refer to our documentation and YouTube video on the Abandoned and Removed Object for further information.
VCA Documentation - Abandoned and Removed Object
YouTube - Abandoned and Removed Object Coming Soon
Below is a list of the currently supported filters, along with a detailed description of each.
When filters are used to trigger an action the rule type property is propagated from the filter input. For example, if the input to the speed filter is a presence rule, then actions generated as a result of the speed filter will have a presence event type.
The speed filter provides a way to check if the speed of an object, which has triggered an input, is moving within the range of speeds defined by a lower and upper boundary.
Note: The channel must be calibrated in order for the speed filter to be available.
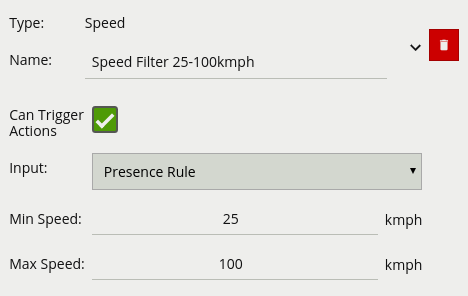
km/h an object must be going to trigger the rulekm/h an object can be going to trigger the rule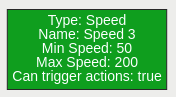
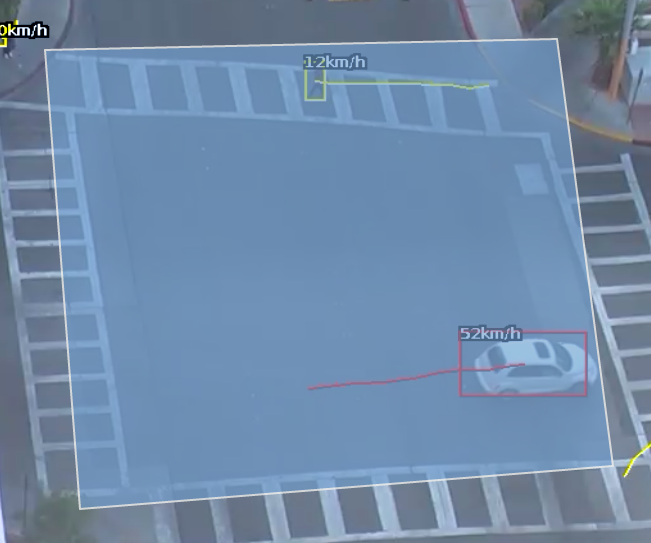
Commonly, this rule is combined with a presence rule, an example rule graph is provided to illustrate this below. The following image illustrates how such a rule combination triggers on the car moving at 52 km/h, but the person moving at 12 km/h falls outside the configured range (25-100 km/h) and thus does not trigger the rule.
Please refer to our documentation and YouTube video on the Speed Filter for further information.
VCA Documentation - Speed Filter
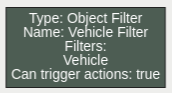
The object filter provides the ability to filter out objects which trigger a rule, if they are not classified as a certain class (e.g. person, vehicle). The available classes which can be used to filter, depend on which tracker is currently selected. In cases where the class is assigned via a deep learning model (DLF, DLOT, DLPT), the confidence threshold can also be used to further filter out objects which the model is not confident about its class.
The object classification filter must be combined with another rule(s) to prevent unwanted objects from triggering an alert.
Note: when using the Object Tracker, the channel must be calibrated for the object classification filter to be available.
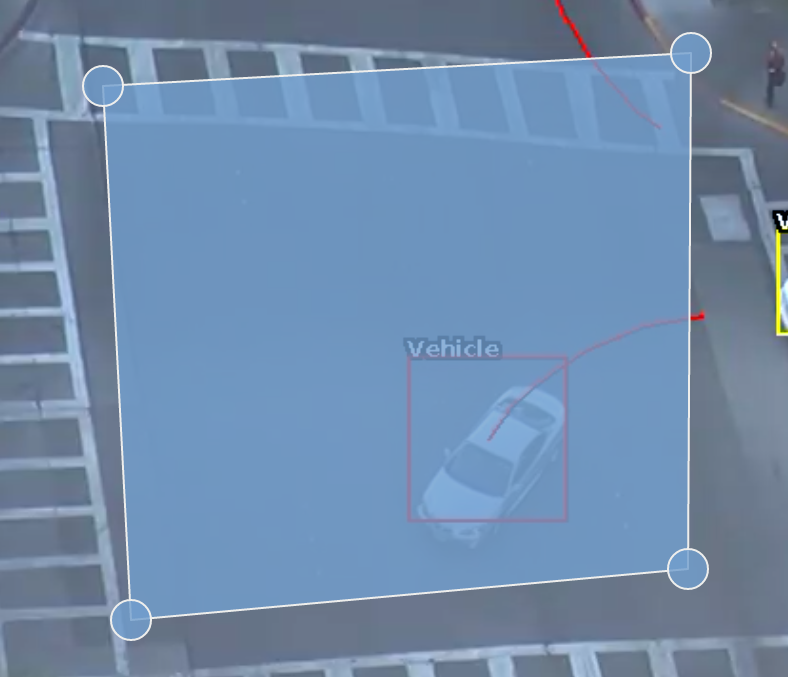
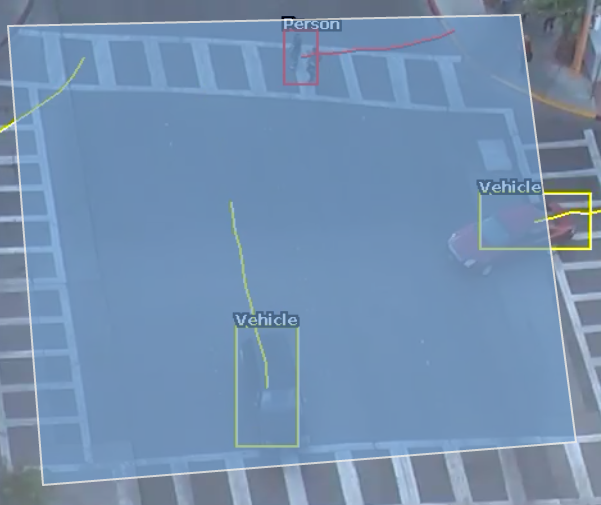
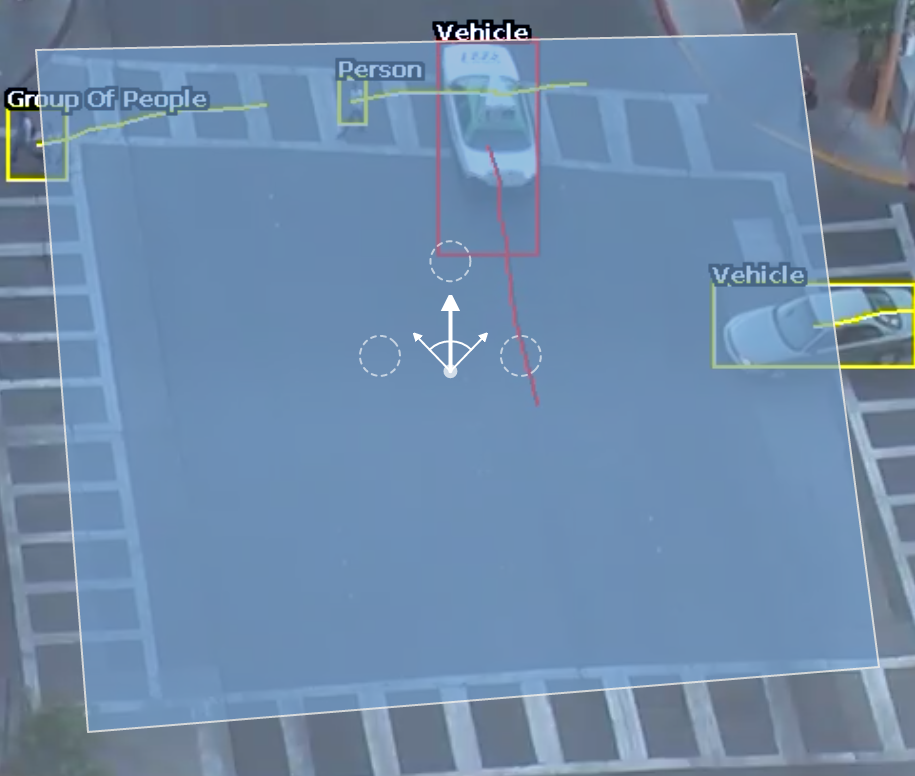
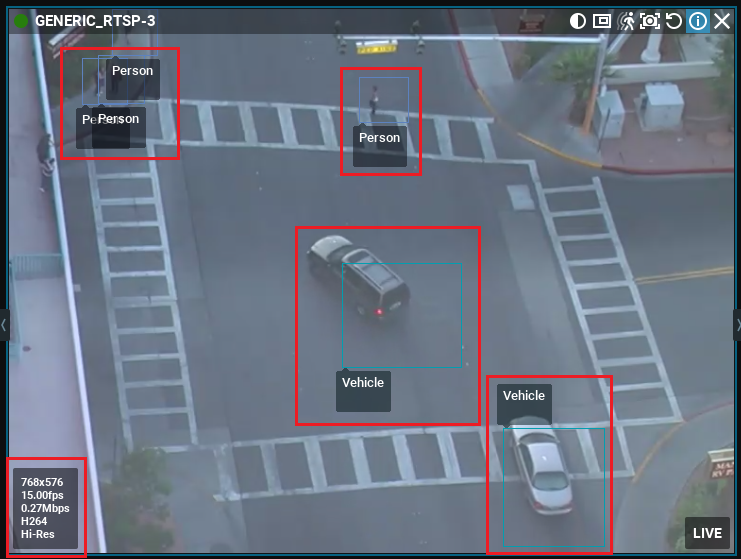
The image below illustrates how the object classification filter configured with Vehicle class, only triggers on Vehicle objects. The person in the zone is filtered out since the Person class is not selected in the filter list.
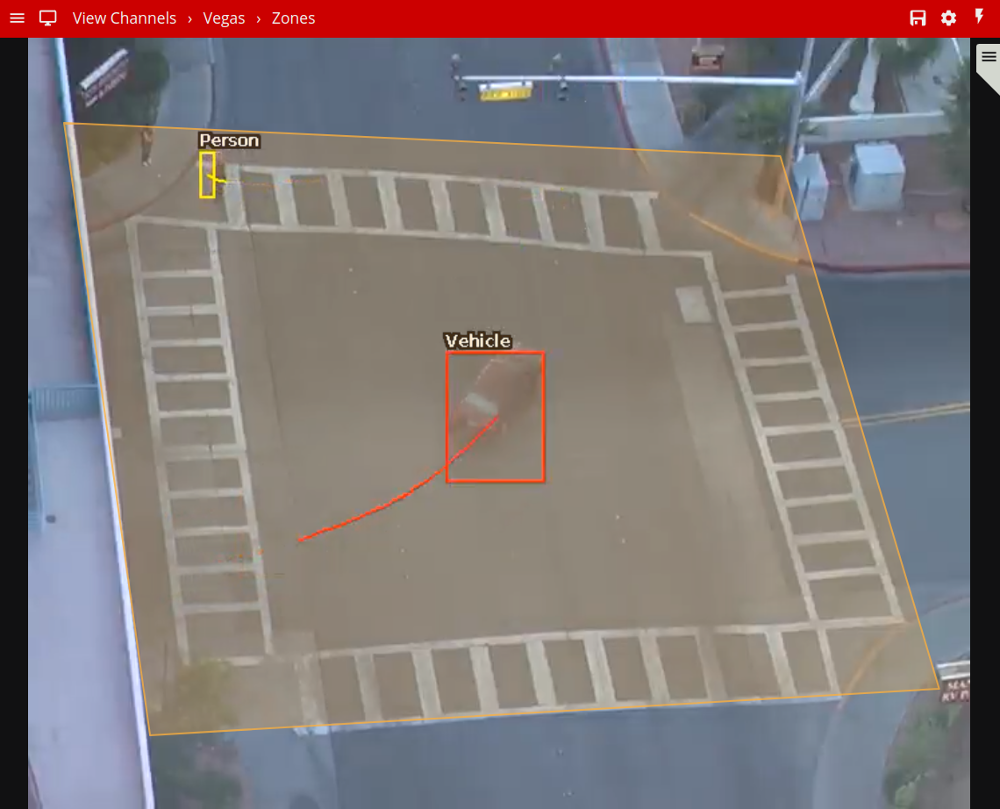

Please refer to our documentation and YouTube video on the Object Filter for further information.
VCA Documentation - Object Filter
YouTube - Object Filter Coming Soon
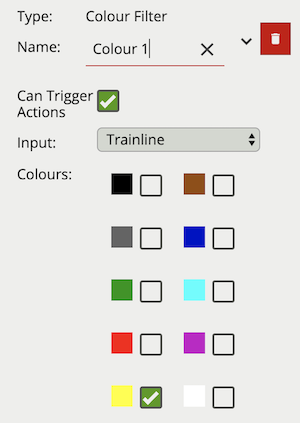
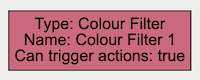
The colour filter rule utilises the Colour Signature algorithm, providing the ability to filter out objects based on an object’s colour components.
The Colour Signature algorithm groups the pixel colours of an object. When a Colour Filter rule is added to a channel, any object that is tracked by VCAserver will also have its pixels grouped into 10 colours. By default this information is added to VCAserver’s metadata, available as tokens, via the SSE metadata service or that channel’s RTSP metadata stream.
The colour filter allows you to select one or more of these colour bins, and will trigger only if the subject object contains one or more of those selected colours.
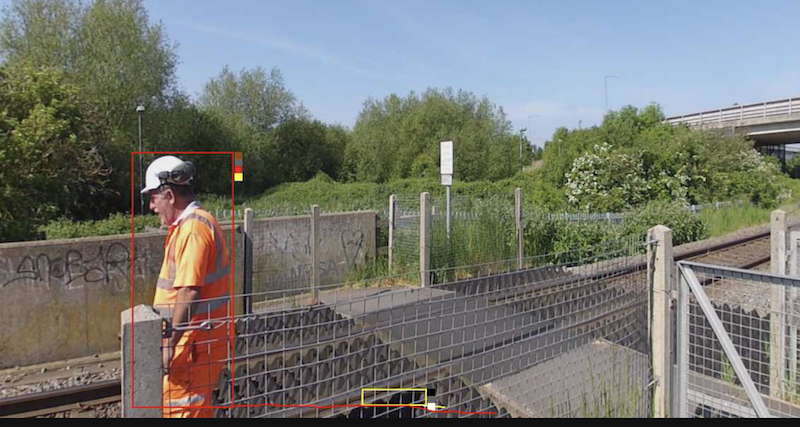
The below image shows an example tracked object with the colour signature annotations enabled. Here the top four colours which make up more than 5% of the object are represented by the colour swatch attached to the object. In this case a person being tracked in the scene with high visibility safety clothing. Here the colour filter is set to trigger on Yellow, detecting the person but ignoring the shadow.
Typically, the colour filter would be combined with another rule(s) to prevent unwanted objects from triggering an alert, an example rule graph is provided to illustrate this below.
The below image illustrates how the colour filter prevents objects, which do not contain the specified colours, from generating an event. In this case only the person generates an event but not the train line.
Note: the channel must have the Colour Signature enabled for the colour filter to work.
Please refer to our documentation and YouTube video on the Colour Filter for further information.
VCA Documentation - Colour Filter
YouTube - Colour Filter Coming Soon
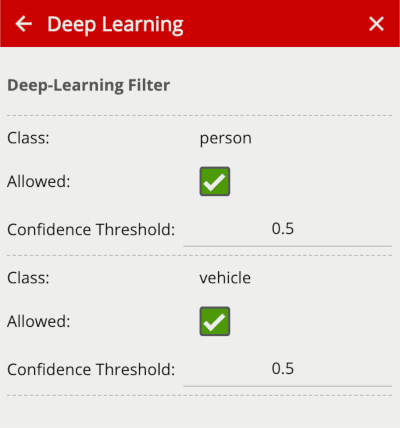
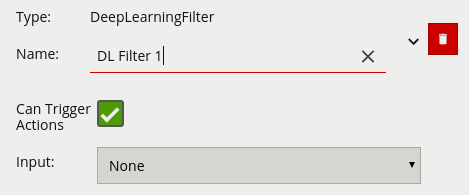
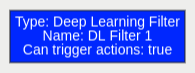
The deep learning filter provides the ability to filter out objects, which trigger a rule, if they are not classified as a certain class by the deep learning model.
The deep learning filter settings are configured in the Deep Learning page. See Deep Learning Filter for an in depth description on how the filter works.
Typically the deep learning filter would be combined with another rule(s), to prevent unwanted objects from triggering an alert,
Note: Please note that the deep learning filter cannot be used as an input to any other rule type. As such it must be the last rule in a graph.
An example image and rule graph is provided to illustrate this below.
Example Image
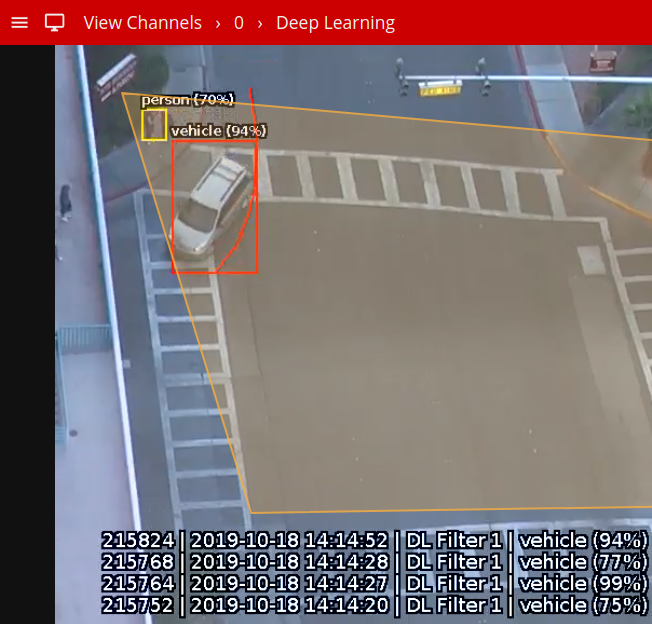
Classification Rule Graph
The previous image illustrates how the deep learning filter, configured with just vehicle class, only triggers on the vehicle object. The person in the zone is filtered out since the person class setting is not enabled in the Deep Learning settings.
Note: The Deep Learning Filter will only work when the Object Tracker is selected under Trackers
Please refer to our documentation and YouTube video on the Deep Learning Filter for further information.
VCA Documentation - Deep Learning Filter
YouTube - Deep Learning Filter Coming Soon
Below is a list of the currently supported conditional rules, along with a detailed description of each.
A logical operator that combines two rules and only fires events if both inputs are true.
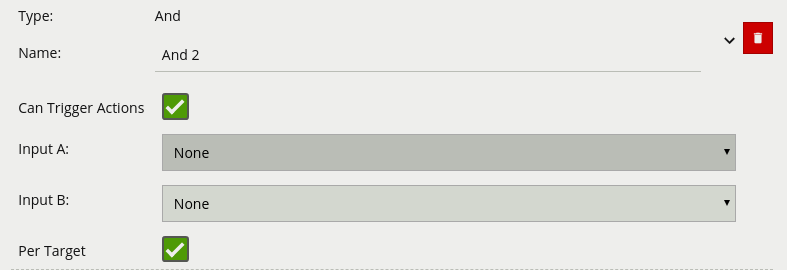
If we consider a scene with two presence rules, connected to two separate zones, connected by an AND rule, the table below explains the behaviour of the Per Target property. Note that object here refers to a tracked object, as detected by the VCA tracking engine.
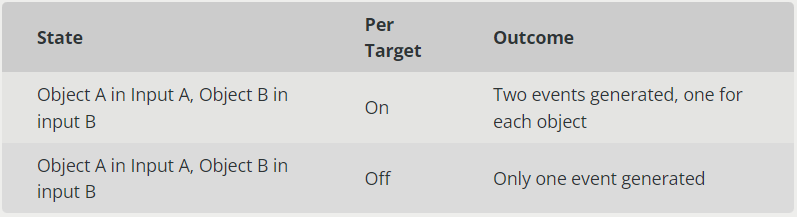
Additionally, it is important to note that if the rule fires when Per Target is switched off, it will not fire again until it is reset, i.e. until the AND condition is no longer true.
Please refer to our documentation and YouTube video on the And for further information.
YouTube - And Coming Soon
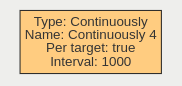
A logical operator that fires events when its input has occurred continuously for a user-specified time.
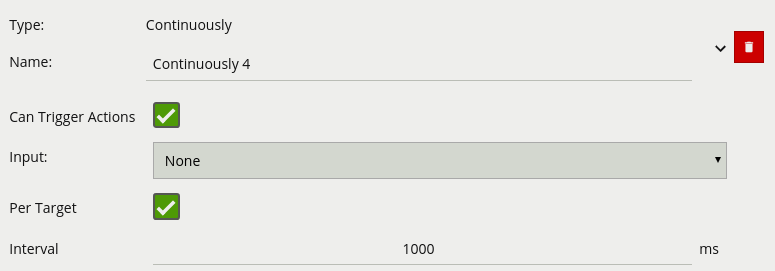
Considering a scene with a Presence rule associated with a zone and a Continuously rule attached to that Presence rule, when the Per Target property is on, the rule will generate an event for each tracked object that is continuously present in the zone. When it is off, only one event will be generated by the rule, even if there are multiple tracked objects within the zone. Additionally, when Per Target is off, the rule will only generate events when there is change of state, i.e. the rule condition changes from true to false or vice versa. When Per Target is off, the state will change when:
Please refer to our documentation and YouTube video on the Continuously for further information.
VCA Documentation - Continuously
YouTube - Continuously Coming Soon
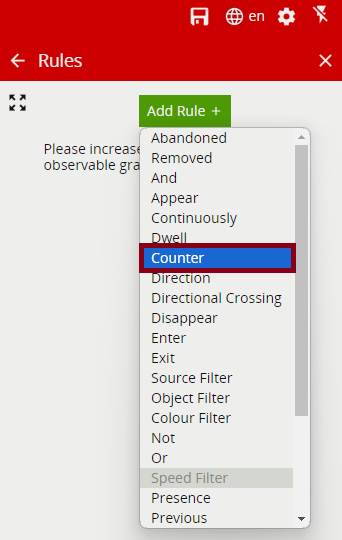
Counters can be configured to count the number of times a rule is triggered. For example, the number of people crossing a line. The counter rule is designed to be utilised in two ways:
Increment / Decrement: whereby a counter is incremented by the attached rule(s) (+1 for each rule trigger), and decremented by another attached rule(s) (-1 for each rule trigger).
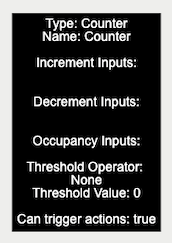
Occupancy: whereby the counter reflects the number of objects that are currently triggering the attached rule(s).
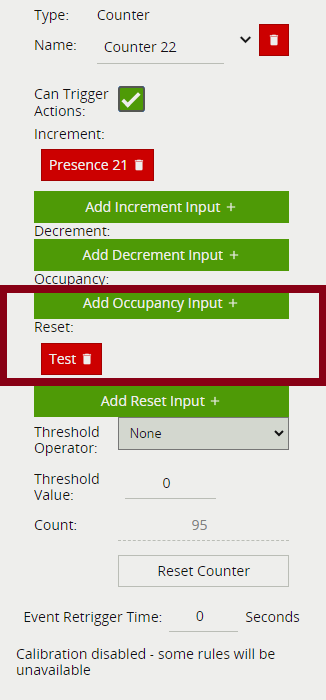
More than one rule can be assigned to any of a counter’s three inputs. This allows, for example, the occupancy of two presence rules to be reflected in a single counter, or more than one entrance / exit gate to reflect in a single counter. An example rule graph is provided to illustrate this below.
Broadly speaking a single counter should not be used for both purposes occupancy and increment / decrement.
The Counter’s Threshold Operator allows the user to limit when a counter generates an event. Based on the selected behaviour and a defined Threshold Value, the counter can be configured to only send events in specific scenarios. Threshold Operators include:
Note: events created by a counter will not trigger the Deep-Learning Filter even if enabled on the channel.
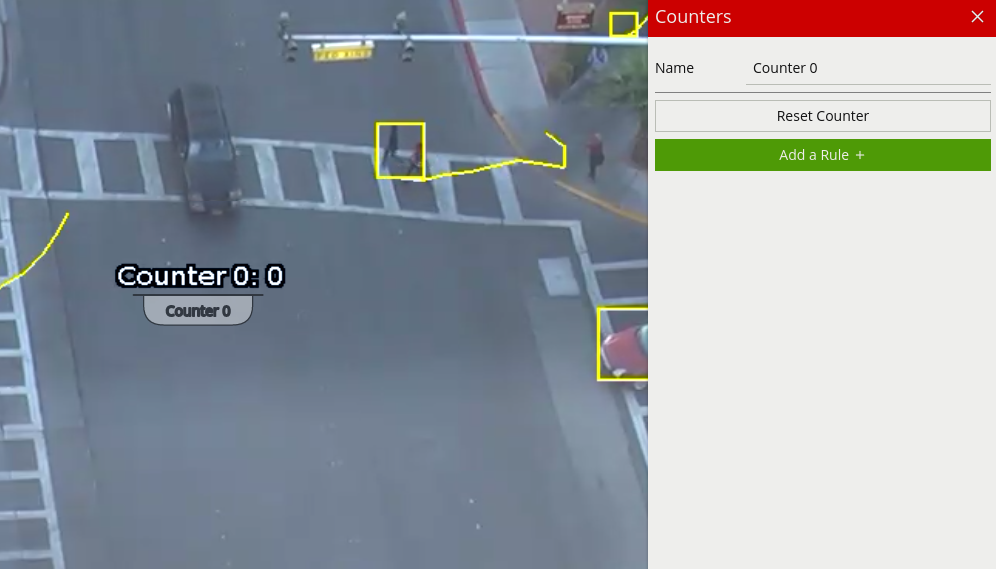
When added, a counter object is visualised on the video stream as seen below. The counter can be repositioned by grabbing the ‘handle’ beneath the counter name and moving the counter to the desired location.
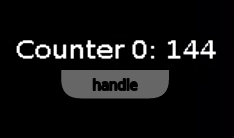
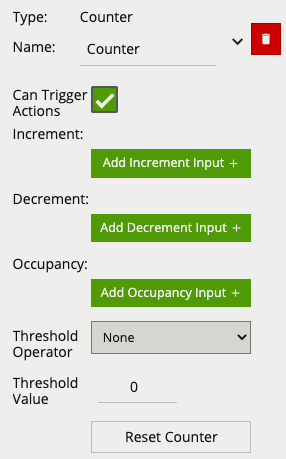
0Example: if a Presence rule is set as the occupancy target and two objects are currently triggering that Presence rule,* the counter will show the value of 2.
Please refer to our documentation and YouTube video on the Counter Rule for further information.
VCA Documentation - Counter Rule
YouTube - Counter Rule Coming Soon
A logical operator that generates an event when the input rule becomes false.

Please refer to our documentation and YouTube video on the Not Rule for further information.
YouTube - Not Rule Coming Soon
A logical operator that combines two rules and fires events if either input is true.
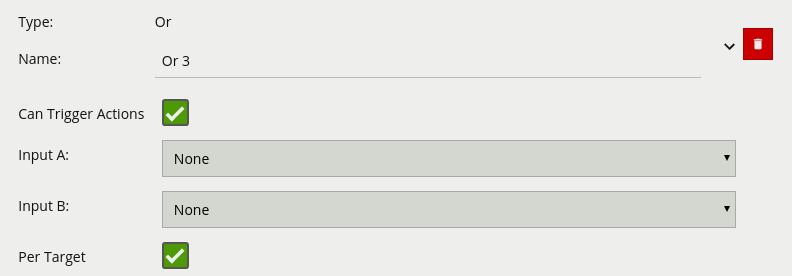
If we consider a scene with two Presence rules connected to two separate zones, connected by an OR rule, the table below explains the behaviour of the Per Target property.
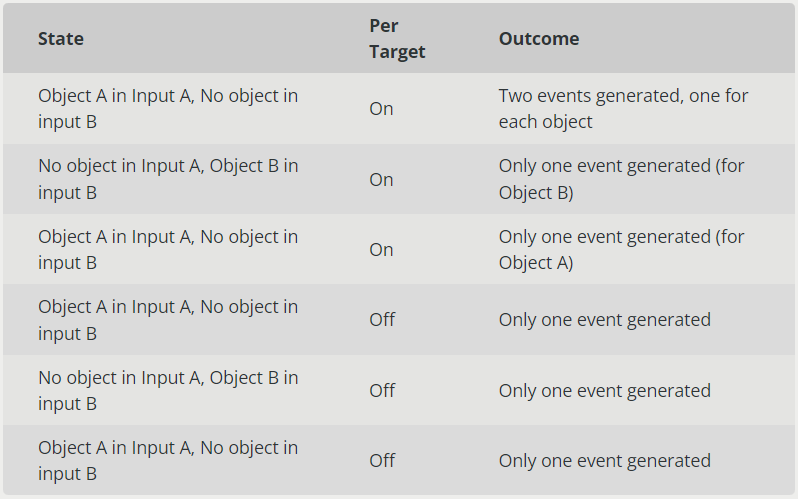
Additionally, it is important to note that if the rule fires when Per Target is switched off, it will not fire again until it is reset, i.e. until the OR condition is no longer true.

Please refer to our documentation and YouTube video on the Or for further information.
A logical operator that triggers for input events which were active at some point in a past window of time. This window is defined as between the current time and the period before the current time (specified by the Interval value).

Please refer to our documentation and YouTube video on the Previous Rule for further information.
VCA Documentation - Previous Rule
YouTube - Previous Rule Coming Soon
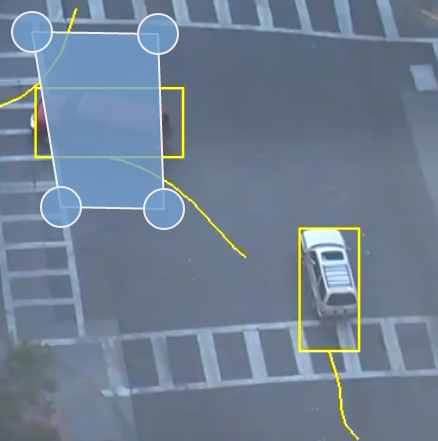
The ‘double-knock’ logical rule triggers when an object enters a zone which had previously entered another defined, zone within a set period of time. The interval on the Previous rule decides how much time can elapse between the object entering the first and second zone.
The rule may be interpreted as follows: ’An object is in Zone 2, and was previously in Zone 1 in the last 1000 milliseconds. This rule can be used as a robust way to detect entry into an area. Since the object has to enter two zones in a specific order, it has the ability to eliminate false positives that may arise from a simple Presence rule.
The graph for a double-knock logical rule is as follows:
Please refer to our documentation and YouTube video on the Previous Rule for further information.
VCA Documentation - Double Knock Rule
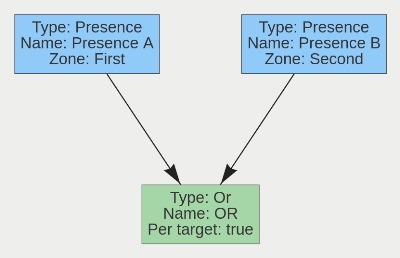
This rule triggers when an object is present in either Zone A or Zone B.
A typical use case for this rule is having multiple areas where access is prohibited, but the areas cannot be easily covered by a single zone. Two zones can be created, associated with two separate Presence rules, and they can then be combined using an Or rule
The graph for a Presence in A or B Rule is as follows:
Please refer to our documentation and YouTube video on the Presence in A or B Rule for further information.
VCA Documentation - Presence in A or B Rule
YouTube - Presence in A or B Rule Coming Soon
To use the VCAbehaviorServer license, you must have VCAserver version 2.1.0 or higher.
The abandoned rule only works with the motion object tracker.
Note: VCAbehaviorServer license is needed for the abandoned rule to work
Please follow the steps below to reset the VCAserver password without erasing the config.
auth directory from the config folderWindows: C:/VCACore/configuration/auth
Linux: var/opt/VCA-Core/configuration/auth
auth directory is absent and creates a default one.The admin password has no restrictions or limitations. VCAserver does not check the password for length or character type.
The hardware specifications for a given system will depend on the intended number of video channels to be processed, as well as which trackers and algorithms will be run on those channels.
To access detailed information regarding hardware specifications, kindly refer to the Prerequisites section within our VCAnx manual.
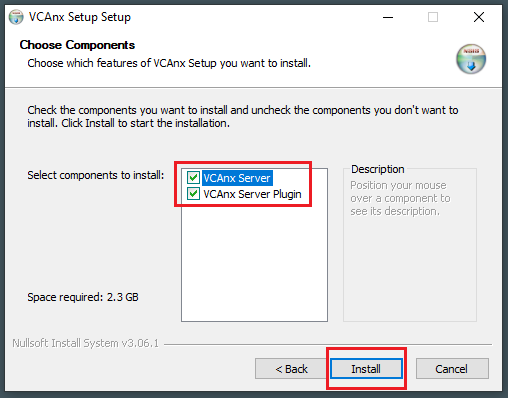
Nx Witness is a lighting fast, easy to use, cross-platform IP video management system (VMS) / video surveillance software designed to discover, view, record, and manage IP video cameras so you can monitor, analyse and react to critical events in real-time. The VCAnx plug-in brings the same great features found in our VCAserver application to the Nx platform in a fully integrated solution. This guide will show you how to install the VCAnx plug-in on Windows.
There are also YouTube videos showing the installation and configuration process for Windows and Linux VCAnx Windows installation guide
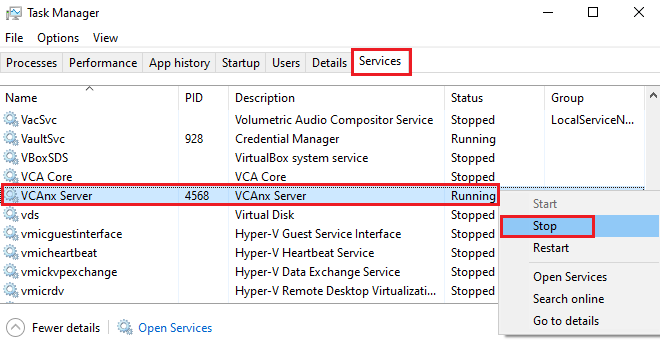
Note: You should stop your Nx Witness server process before starting the installation.
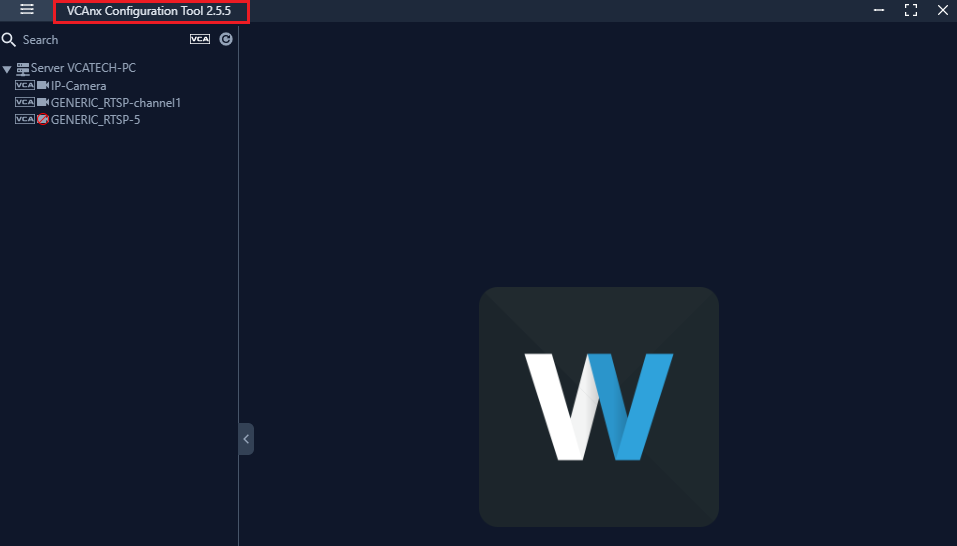
The configuration tool was designed to provide a simple easy-to-use method of configuring the analytics for each of the channels, it provides a similar interface to the rest of our applications and advanced features that are not available through the Nx Client.
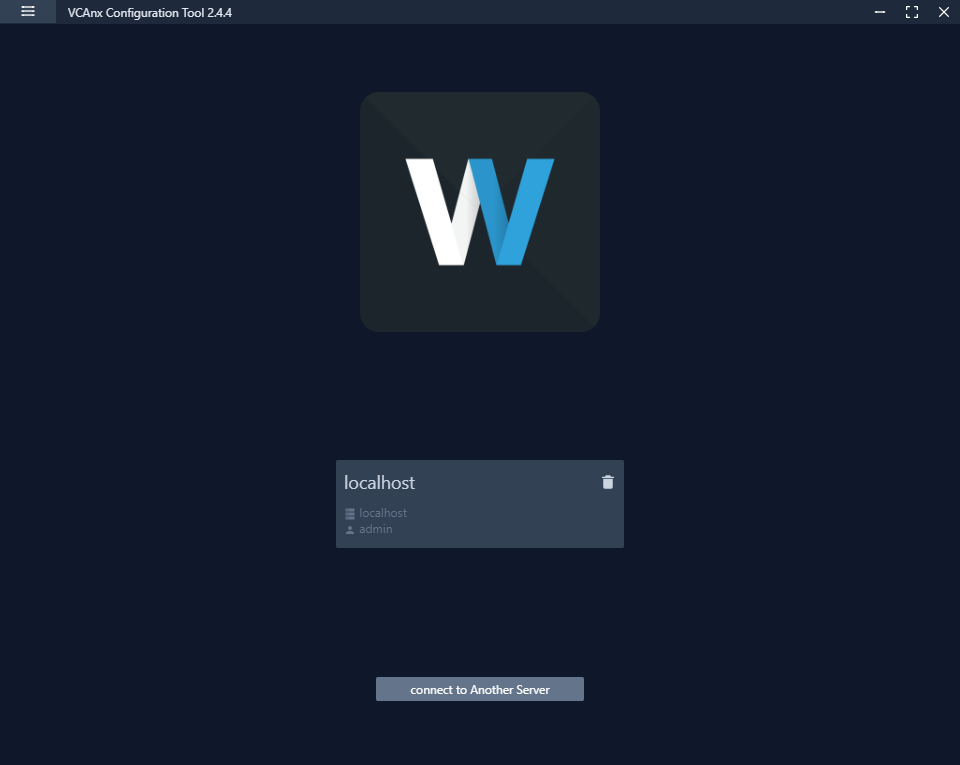
Please refer to the VCAnx user manual and YouTube videos for more information.
The latest user manual can be found on the download page in the support portal under the VCAnx section and the YouTube video detailing the process is available on our YouTube channel. VCAnx Windows installation guide
Nx Witness VMS is a lighting fast, easy to use, cross-platform IP video management system (VMS) / video surveillance software designed to discover, view, record, and manage IP video cameras so you can monitor, analyse and react to critical events in real-time. The VCAnx plug-in brings the same great features found in our VCAserver application to the Nx platform in a fully integrated solution. This guide will show you how to install the VCAnx plug-in on Linux.
There are also a YouTube video showing the installation and configuration process for Linux VCAnx Linux installation guide
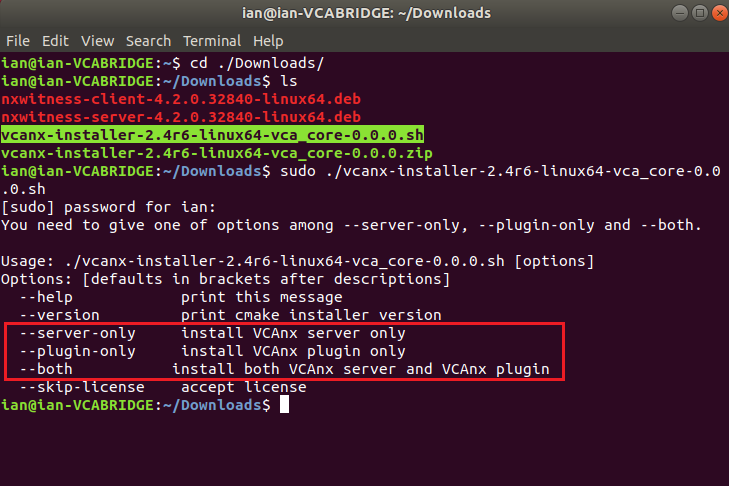
The .sh script consists of 3 different install options.
Server only:
sudo ./vcanx-installer-**VERSION_NUMBER**-linux64-vca_core-**VERSION_NUMBER**.sh –server-only
Plug-in only:
sudo ./vcanx-installer-**VERSION_NUMBER**-linux64-vca_core-**VERSION_NUMBER**.sh –plugin-only
Both:
sudo ./vcanx-installer-**VERSION_NUMBER**-linux64-vca_core-**VERSION_NUMBER**.sh –both
The configuration tool was designed to provide a simple easy-to-use method of configuring the analytics for each of the channels, it provides a similar interface to the rest of our applications and advanced features that are not available through the Nx Client.
sudo snap install /vcanx-config-installer-**VERSION_NUMBER**.snap –dangerousPlease refer to the VCAnx user manual and YouTube videos for more information.
The latest user manual can be found on the downloads page in the support portal under the VCAnx section and the YouTube video is available on our YouTube channel.
When a new version of VCAnx has been released for Windows, you can download and update to use the new features and benefit from the improvements we have made. This is the guide on how to update VCAnx to the latest version.
Note: The VCAnx server component can be installed on the same hardware platform as Nx Witness or on a different system. Depending on your system setup this guide will show you how both upgrades of VCAnx Server component are done.
Search for Task Manager

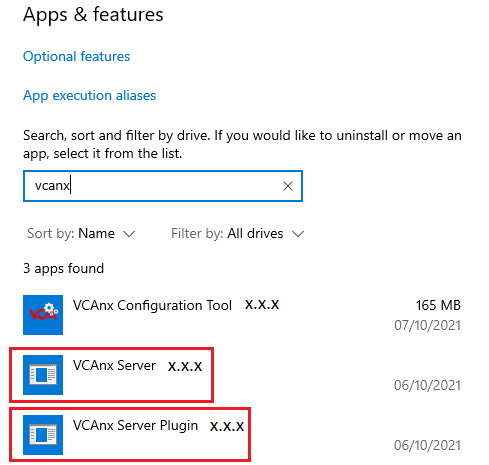
Search for your current installed VCAnx Server and VCAnx Plug-in in Apps & Features
Go to the VCA Technology Download page (login required) you will see the latest version of VCAnx
Check under Version to see if there is a new version from the one you were currently using
Click on VCAnx (Windows) to download
or further information please refer to our VCAnx Documentation
Nx Witness and the VCAnx provide powerful and flexible analytics that can be used to create alerts when you need them. Nx Witness can be configured to react to events using all the alert features available through the server. This is a guide on how to set up a simple desktop notification in Nx when an analytic event occurs.
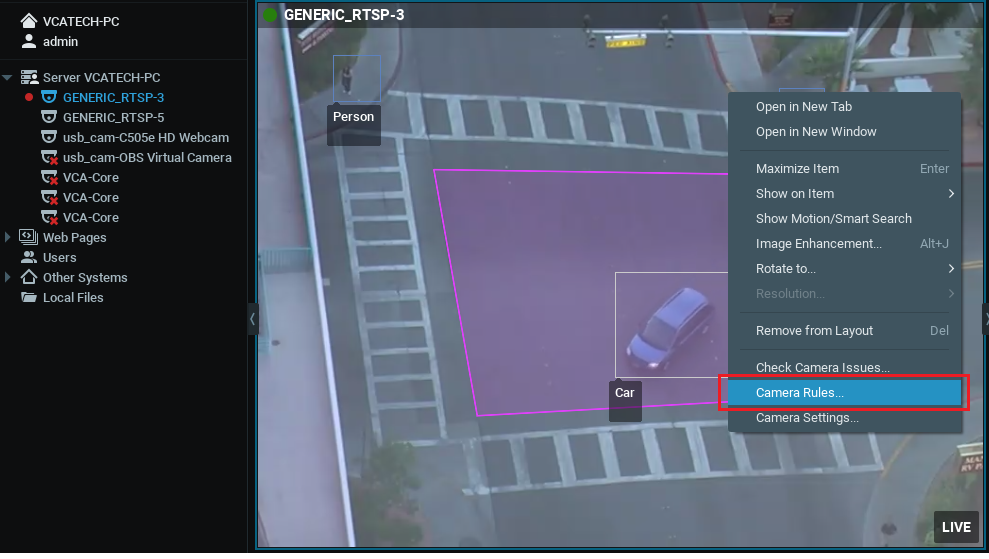

Note: Every Event that has occurred is automatically saved in the system’s Event Log.
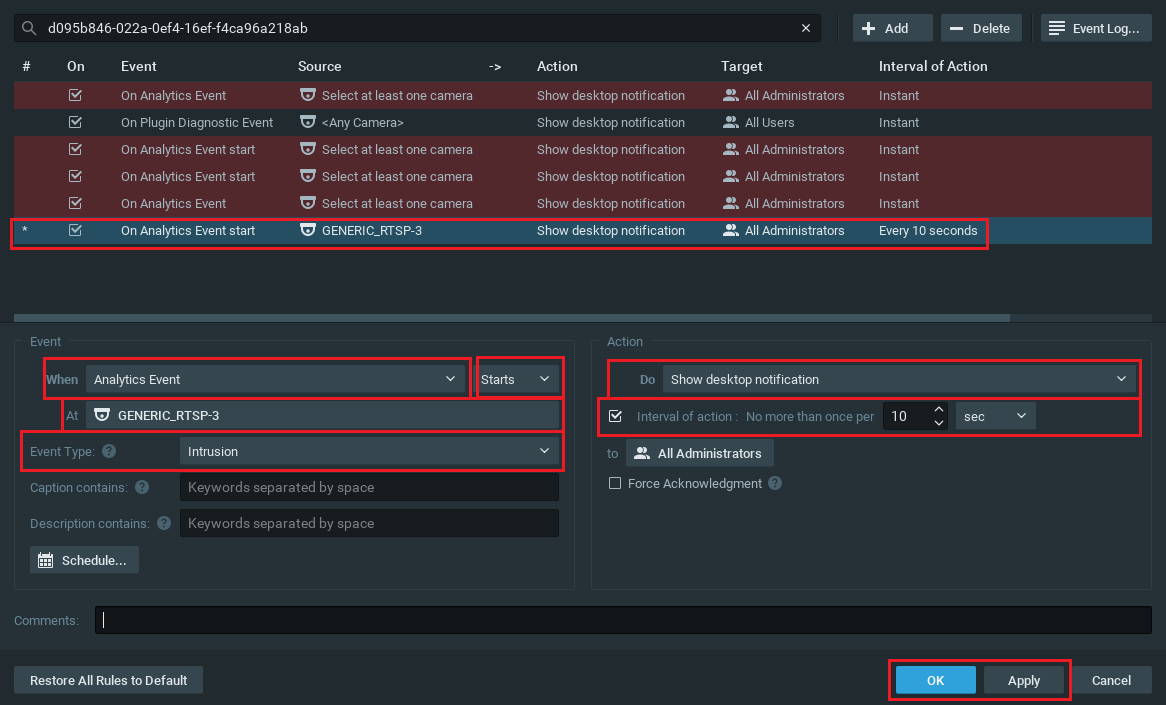
For more details on defining camera rules in NX, see the Nx documentation.
You can create multiple rules for each camera in Nx, these rules will produce event data that can be acted on through all the Nx features.
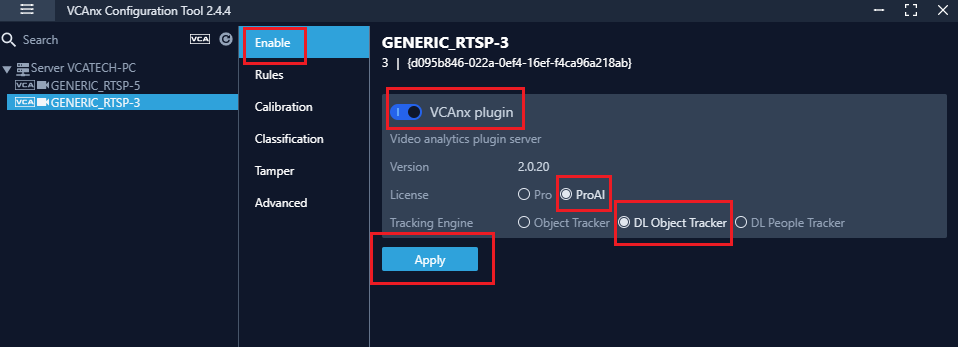
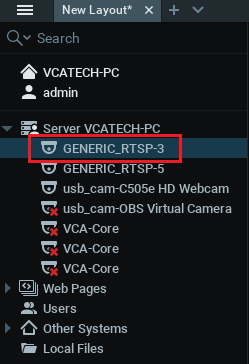
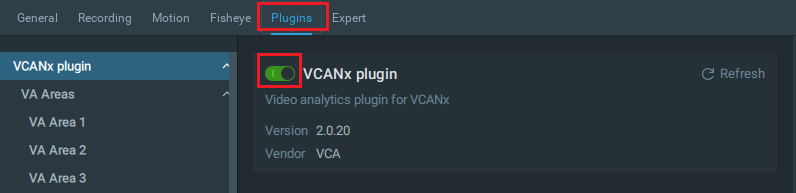
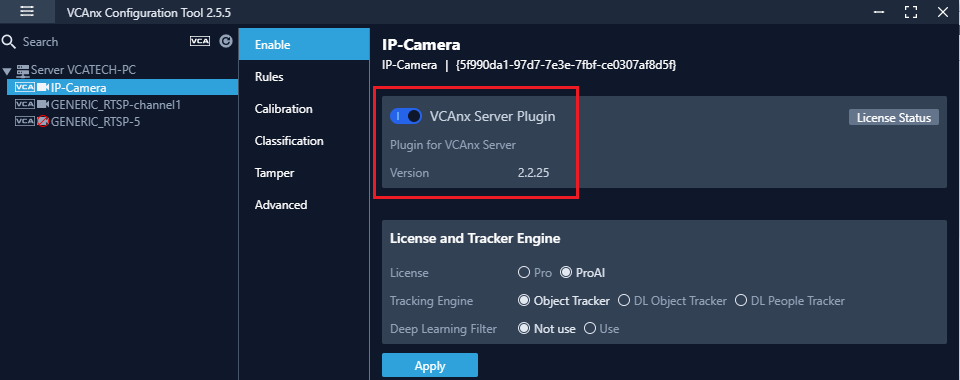
After the Nx Witness server has been configured to use the VCAnx servers, enable the plug-in for each of the cameras where you want to apply video analytics.
With the VCAnx Plug-in, the Zones are created automatically when you pick a Rule.
For more information, the VCAnx documentation can be found on the download page through the support portal. VCAnx Downloads
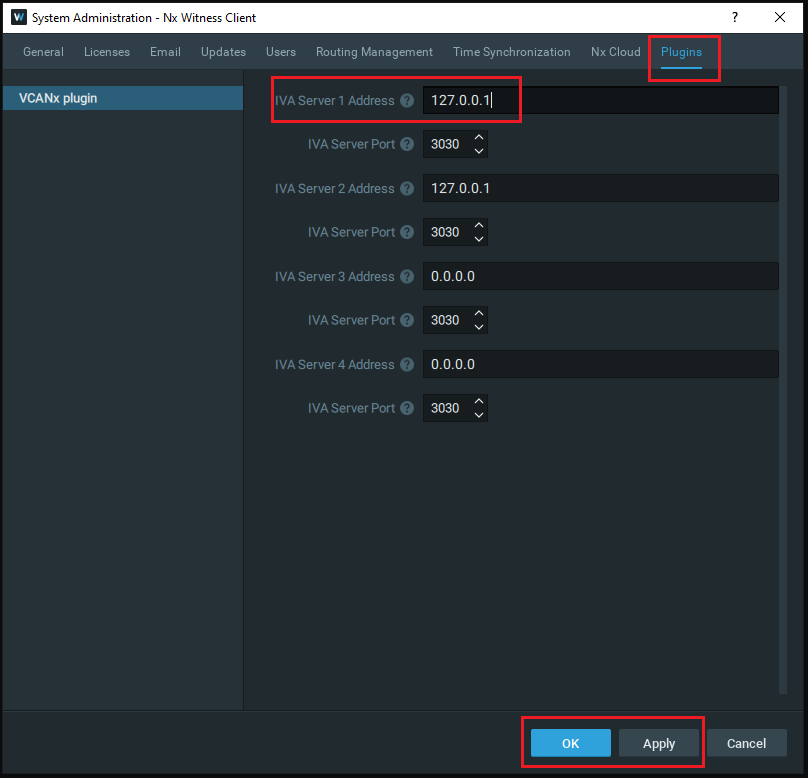
The Nx Witness VMS can be configured to use up to four instances of the VCAnx server, allowing a large number of channels to have analytic features while spreading the load across multiple hardware platforms.
In order to use the analytic features a license is required. Please refer to your software distributor to obtain licenses. VCAnx provides a Configuration Tool to allow the management of licenses and to define servers and enable licenses against channels that control which features are available. Please refer to our VCAnx documentation for more information on licensing. Or alternatively you can have a look at our FAQ on How do I license my VCAnx Plug-in for more details.
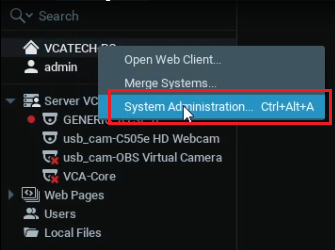
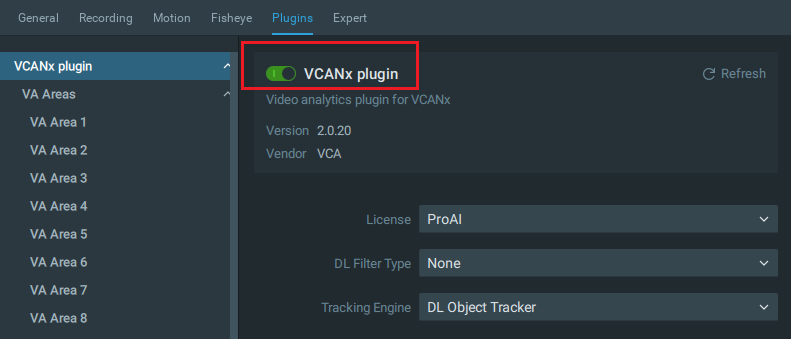
Click the Plug-ins tab.
Define the server address details for each of the VCAnx servers you want to use.
Note: If VCAnx is installed on the same hardware as Nx Witness then you can use 127.0.0.1 or localhost.

Use the VCAnx configuration tool to configure the analytic rule and produce events.
The latest user manual can be found on the Download Page in the support portal under the VCAnx section and the YouTube video detailing the process is available on our YouTube channel.
There are also YouTube videos showing the installation and configuration process for Windows and Linux YouTube VCAnx playlist
In order to use the analytic features, a license is required. Licenses can be managed through the configuration tool. Please refer to your software distributor to obtain licenses.
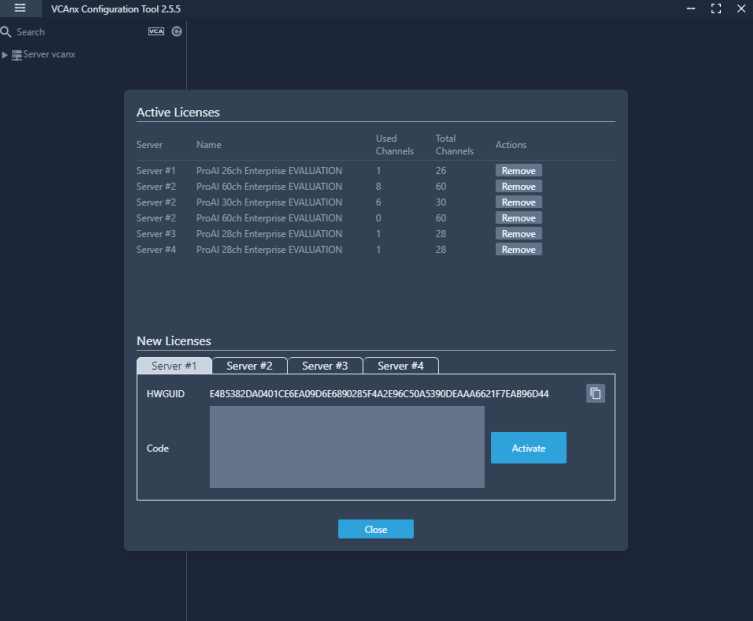
Tabs are created for each server, select the server tab to view the HWGUID and new licenses.
For more information on licensing please refer to our VCAnx documentation
The VCAnx features consist of three components, packaged into a release that is available on the download page in the support portal.
The location of the version for each of the components is detailed below.
VCAnx Server:
/opt/vcanx/version.txtType cat /opt/vcanx/version.txt in Terminal to see the Server version.
Apps & Features.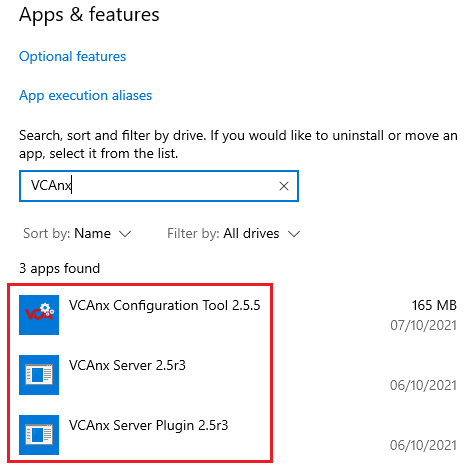
VCAnx Plug-in:
VCAnx Configuration Tool:
VCAedge is the video analytic plug-in that is installed on an IPM camera To get the VCAedge analytics working you need to install the VCAedge plug-in
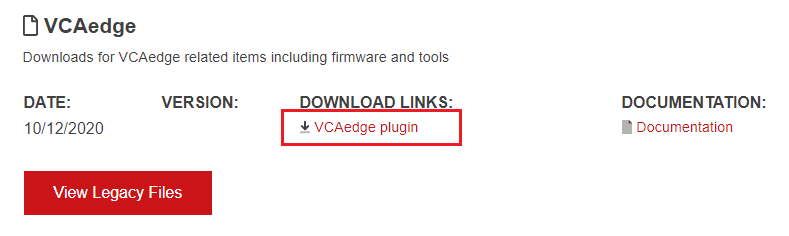
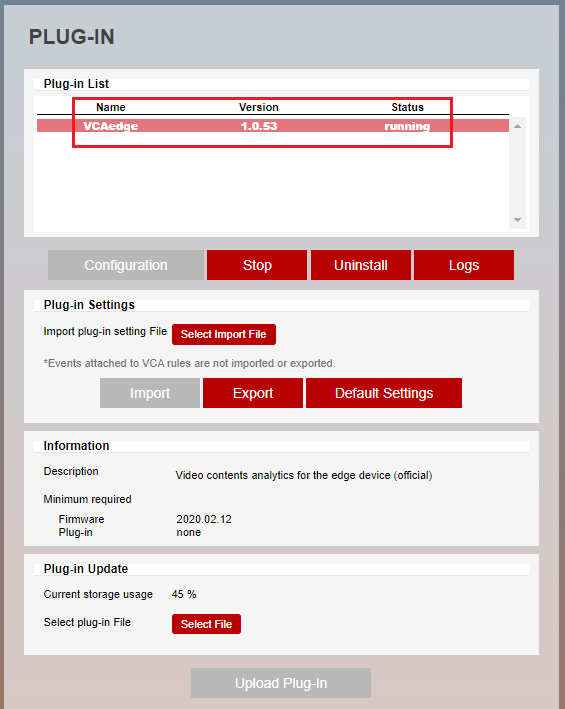
Please refer to our documentation on the VCAedge Plug-in for further information.
In order to use the VCAedge analytic features you need to add license to the VCAedge plug-in.
Note: Please make sure that you already have access to the camera and the VCAedge plug-in is installed before applying the analytics license
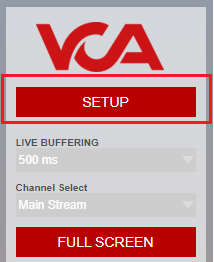
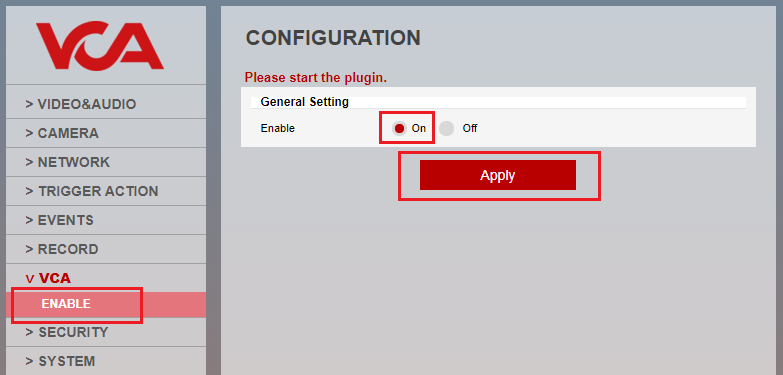
Click on Setup to enter into the configuration menu
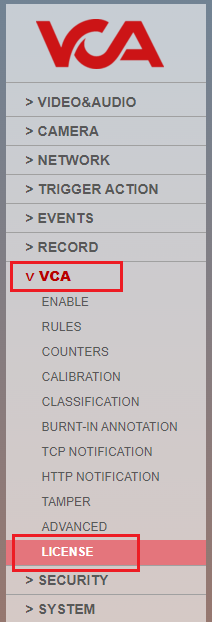
You will need a activation code to load the license. To do this you will need to take a note of the HWCODE to obtain an activation code.
Enter the Activation Code into the space available and then select Activate
For more information on applying license to VCAedge please refer to our YouTube video
YouTube - How to license VCAedge
Calibration is required in order for VCAedge to classify objects into different object classes. Once the camera has been calibrated, it can infer real-world object properties such as speed, height and area and classify objects accordingly.
For the full guide on the VCAedge calibration please go to our YouTube - How to use Calibration in VCAedge
To enable ONVIF in the camera please follow the guide below.
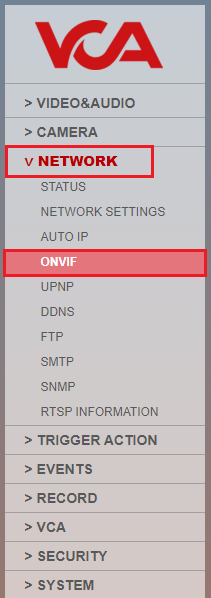
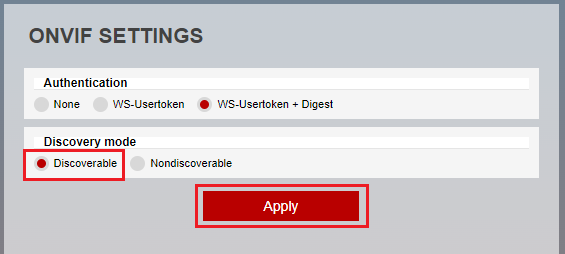
For more information please refer to your cameras user manual.
The difference in the tracker engine for Deep Learning Object Tracker and Deep Learning People Tracker lies in their respective capabilities and intended use cases. While both Deep Learning Object Tracker and Deep Learning People Tracker use deep learning techniques for tracking, they are optimized for different purposes.
This tracker engine is designed to track and follow objects in a video sequence. It uses deep learning algorithms to detect and track various types of objects, such as vehicles, animals, or inanimate objects, based on their visual features. The focus is on tracking objects of different shapes, sizes, and appearances, and the algorithm is optimized for robust object tracking in various challenging conditions, such as occlusion, lighting changes, and motion blur.
This tracker engine, on the other hand, is specifically designed for tracking people in a video sequence. It utilizes deep learning algorithms to detect and track individuals based on their human body features, such as body pose, body parts, and clothing appearance. The emphasis is on accurately tracking human movements, behaviours, and interactions in a video stream, and the algorithm is optimized for human-centric tracking tasks, such as surveillance, action recognition, and behaviour analysis.
BIA data can only be displayed on one video stream at a time.
VCA sends notifications using a mixture of plain text and tokens.
When an object is triggered, a notification is sent to each object that is triggering the rule. Each time an object triggers a rule, a notification is sent for that object.
Send a notification every time the rule is triggered, beginning with the first object to trigger the rule and ending with the last object to trigger the rule. No matter how many objects trigger the rule at the same time.
Please refer to the Enable/Disable section in our VCAedge document for more details.
VCA counters can be reset by using API calls. Please refer to our VCAedge integration API document for more details.
The Nx plug-in extends the functionality of the main software. Nx Witness allows various plug-ins. Among the plug-ins, there is a plug-in for VCAedge’. It enables Nx Witness to receive video analytics metadata from a supported camera.
VCAedge is the name of a plug-in for the camera and enables the camera to perform video analytics. The ‘Nx plug-in for VCAedge’ is installed on the Nx Witness Server. Whereas ‘VCAedge’ is installed on the camera.
For more information please refer to the section titled Nx Witness Plug-in for Windows in the Nx plug-in for VCAedge documentation.
The Nx plug-in extends the functionality of the main software. Nx Witness allows various plug-ins. Among the plug-ins, there is a plug-in for VCAedge’. It enables Nx Witness to receive video analytics metadata from a supported camera.
VCAedge is the name of a plug-in for the camera and enables the camera to perform video analytics. The ‘Nx plug-in for VCAedge’ is installed on the Nx Witness Server. Whereas ‘VCAedge’ is installed on the camera.
For more information please refer to the section titled Nx Witness Plug-in for Linux in the Nx plug-in for VCAedge documentation.
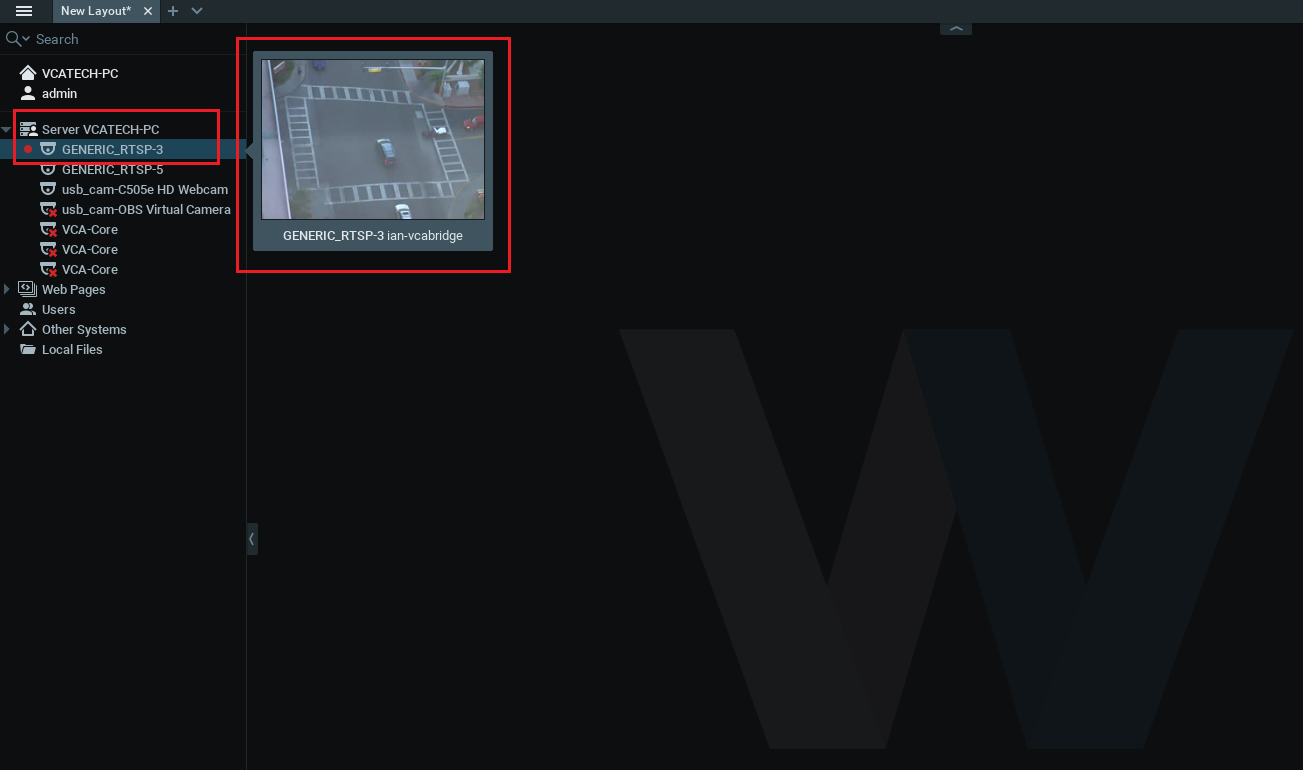
When the installation is completed and a new camera is installed Nx Witness automatically scans for new devices by default. New devices will be listed.
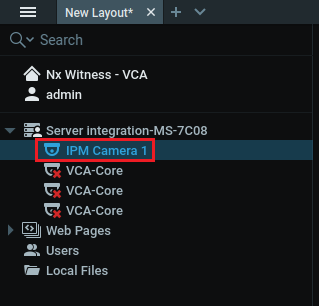
Note: Devices that are not discovered will need to added manually.
or more information please refer to the section titled Configuration in the Nx plug-in for VCAedge documentation.
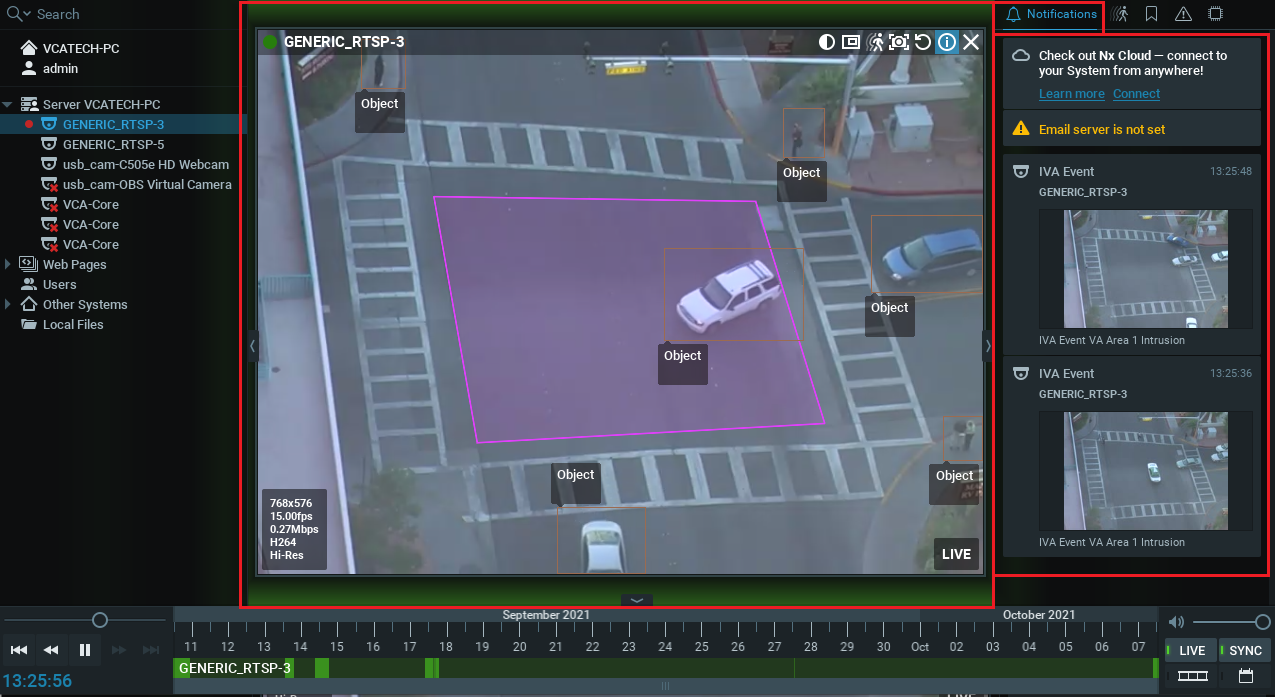
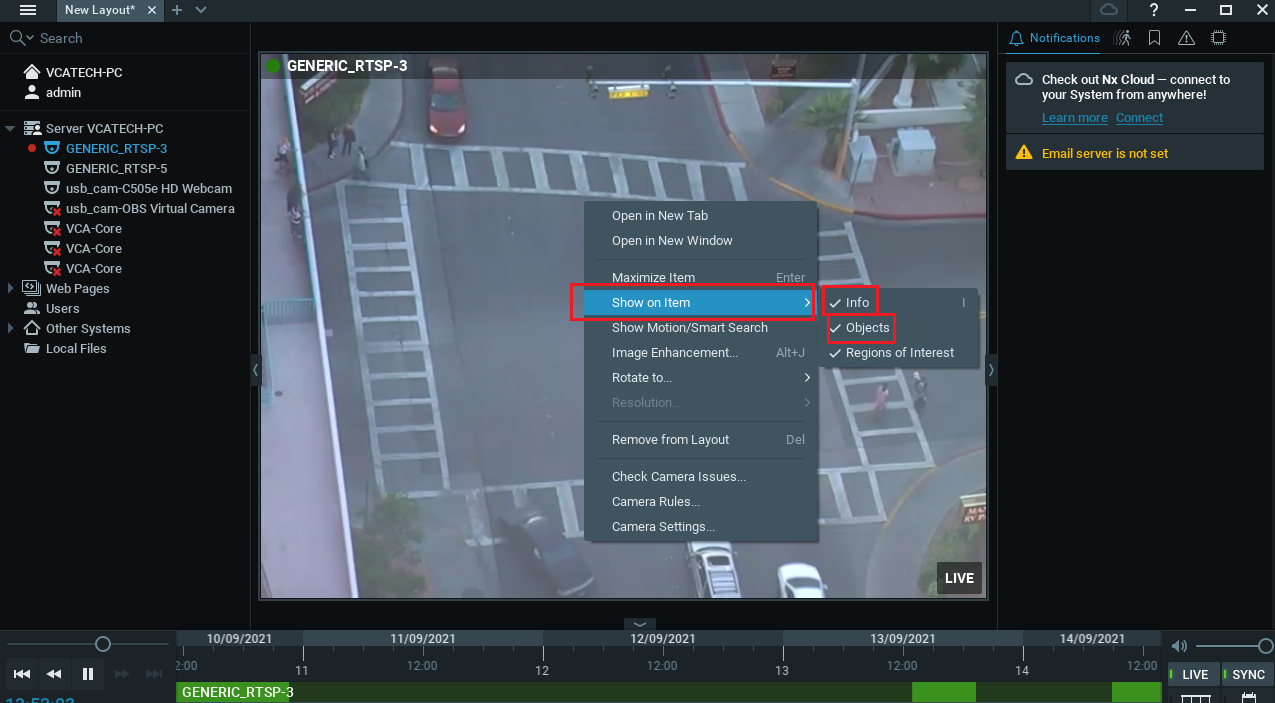
The events generated by VCAedge can be linked to the camera actions feature within Nx Witness and the notifications of the events generated through the plug-in can be displayed in the Notifications tab by clicking on the bell icon at the right top.
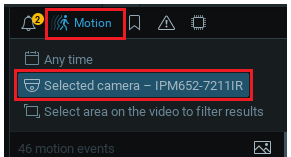
For more information please refer to the section titled Configuring the Camera Rules in Nx Witness in the Nx plug-in for VCAedge documentation.
Please refer to your cameras user manual for details on how to perform a reset IPM/IPAi documentation.
You can only use ONVIF profile S with the STARVIS 2MP Bullet IP Camera. Profile S is designed for IP-based video systems. A Profile S device (e.g., an IP network camera or video encoder) is one that can send video data over an IP network to a Profile S client. A Profile S client (e.g., a video management software) is one that can configure, request, and control video streaming over an IP network from a Profile S device. Profile S also covers ONVIF specifications for PTZ control, audio in, multi casting and relay outputs for the relevant devices and clients that support such features.
The maximum size micro SD card that can be used in IPM cameras is 512GB
This could be due to the use of the WDR feature on the camera. Its resource usage restricts the number of frames the camera can deliver at high resolutions.
Please refer to the specific cameras user manual for more information.
IPM/IPAi These are our range of camera products.
VCAedge Is a plug-in for the camera that provides video analytics.
Please refer to our range of camera products for more details.
Please refer to the VCAedge Plug-in Manual for more details.
VCAnx Is VCA’s integrated video analytics package for Nx Witness, allowing all the advanced rules and deep learning features to be used within Nx Witness.
Nx Plug-in for VCAedge is a plug-in for Nx that allows Nx to pull metadata straight from VCAedge.
Please refer to the VCAnx Manual for more details.
Please refer to the Nx Witness Plug-in Manual for more details.
You can use the VCAedge plug-in on the camera to track objects.
Please refer to the VCAedge Plug-in Manual for more details.
The default RTSP connection strings are:
rtsp://<IP ADDRESS>:554/channel1rtsp://<IP ADDRESS>:554/channel2rtsp://<IP ADDRESS>:554/channel3Please refer to your cameras user manual for details IPM/IPAi documentation.
A IPM/IPAi camera can have multiple channels that can be connected too, they are dependent on the camera.
Please refer to your cameras user manual for details on how many channels your IPM/IPAi camera has IPM/IPAi documentation.
The default address is created from the camera’s MAC address.
Please refer to your cameras user manual for more details IPM/IPAi documentation.
For the default username and password, please refer to your cameras user manual for details. IPM/IPAi documentation.
We have ANPR analytics that can be added to our IPAi cameras by installing our APNR plug-in.
Please refer to the ANPR Plug-in User Guide. for more details.
The APNR plug-in can be downloaded from our Downloads page.
Note: ANPR requires an ANPR license to operate, please speak to your local sales representative for more details.
Please refer to your cameras user manual for details on the maximum bitrate supported IPM/IPAi camera IPM/IPAi documentation.